How To Fix Bubbles In Tinted Windows: The Ultimate Guide For DIY Enthusiasts
So, you've got those pesky bubbles in your tinted windows, huh? Don't worry, you're not alone. Bubbles in tinted windows are one of the most common issues car owners face, and they can be a real eyesore. Whether it's a small air pocket or a massive bubble cluster, it's definitely something you want to fix ASAP. Lucky for you, we've got all the answers you need to tackle this problem like a pro.
Now, before we dive into the nitty-gritty of how to fix bubbles in tinted windows, let's talk about why this happens in the first place. It could be due to improper installation, temperature changes, or even low-quality tint material. Whatever the reason, the good news is that it's totally fixable. And guess what? You don't need to spend a fortune on professional services. We'll show you how to DIY it in no time.
But here's the deal—fixing tinted window bubbles isn't just about aesthetics. It's also about safety and functionality. Bubbles can compromise the tint's effectiveness, reduce visibility, and even damage the glass over time. So, whether you're doing it for looks or practicality, this guide will walk you through every step of the process. Let's get started!
Read also:Bela Sardines Review A Deep Dive Into The Hottest Trend In The Snack World
Table of Contents
- What Causes Bubbles in Tinted Windows?
- Tools and Materials You'll Need
- Preparing Your Workspace
- Removing the Old Tint
- Cleaning the Glass Thoroughly
- Applying New Tint
- Tips for Preventing Future Bubbles
- How Much Does It Cost to Fix?
- Should You Go Pro?
- FAQs About Fixing Tinted Window Bubbles
What Causes Bubbles in Tinted Windows?
Alright, let's talk about the root of the problem. Bubbles in tinted windows can happen for a variety of reasons, and understanding the cause is key to fixing it properly. Here are the most common culprits:
- Improper Installation: If the tint wasn't applied correctly in the first place, air pockets can form between the tint and the glass. This is usually due to uneven application or trapped moisture.
- Low-Quality Tint: Cheap window tint materials are more prone to bubbling because they don't adhere as well to the glass. Investing in high-quality tint can save you a lot of headaches in the long run.
- Temperature Changes: Extreme heat or cold can cause the tint to expand or contract, leading to bubbles. This is especially common in areas with harsh climates.
- Moisture Build-Up: If water or condensation gets trapped between the tint and the glass, it can create those unsightly bubbles. This often happens if the edges of the tint aren't sealed properly.
Now that you know what causes bubbles in tinted windows, it's time to move on to the next step—fixing it!
Tools and Materials You'll Need
Before you start fixing those bubbles, you'll need to gather the right tools and materials. Don't worry, most of these items are probably already in your garage or toolbox. Here's what you'll need:
Tools
- Plastic scraper or putty knife
- Heat gun or hairdryer
- Spray bottle
- Squeegee
- Microfiber cloth
Materials
- New window tint film
- Alcohol-based cleaner
- Distilled water
- Soap solution
Having the right tools and materials will make the process a lot smoother and more efficient. Trust us, you don't want to be halfway through the job and realize you're missing something crucial.
Preparing Your Workspace
Alright, you've got your tools and materials ready—now it's time to prep your workspace. This step is crucial because a clean and organized workspace will help you avoid mistakes and ensure a professional-looking result.
First things first, make sure your car is parked in a shaded area. Direct sunlight can cause the tint to heat up and warp, making it harder to work with. Next, clean the exterior and interior of the window thoroughly. You don't want any dirt or debris getting in the way while you're working.
Read also:Whats White Day In Japan A Sweet Celebration With A Twist
Finally, lay down some old towels or a drop cloth on the seats and dashboard to protect them from scratches or damage. You'll thank yourself later when everything comes out looking pristine.
Removing the Old Tint
Now comes the fun part—removing the old tint. This step might seem intimidating, but with the right technique, it's actually pretty straightforward.
Start by heating up the tint with a heat gun or hairdryer. This will loosen the adhesive and make it easier to peel off. Be careful not to get too close to the glass, as excessive heat can cause cracks or damage.
Once the tint is warm, use a plastic scraper or putty knife to gently lift the edge. Work your way around the window, peeling off the tint in sections. If you encounter any stubborn spots, reapply heat and try again. Patience is key here!
Pro tip: If the old adhesive is leaving a sticky residue on the glass, don't worry. We'll tackle that in the next step.
Cleaning the Glass Thoroughly
Once the old tint is off, it's time to clean the glass. This step is crucial because any dirt, grime, or adhesive residue can interfere with the new tint's adhesion.
Start by mixing a solution of distilled water and soap in a spray bottle. Spray the solution generously on the glass and use a microfiber cloth to wipe it down. Make sure to clean both the interior and exterior surfaces of the window.
Next, use an alcohol-based cleaner to remove any remaining adhesive residue. This will ensure a smooth and clean surface for the new tint. Don't skip this step—it can make or break the final result!
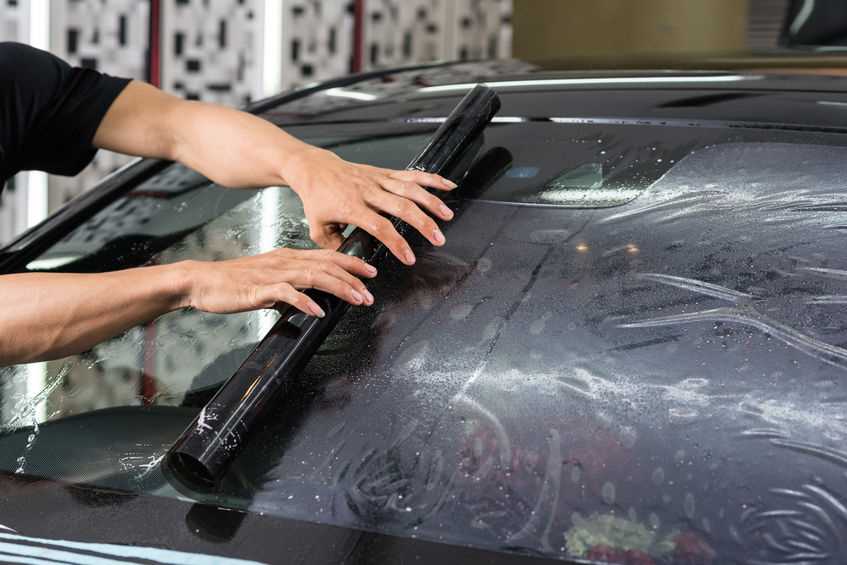
Applying New Tint
Alright, you've made it to the final stretch—applying the new tint. This is where the magic happens!
Start by measuring and cutting the new tint film to fit the window. Leave a little extra on all sides to account for trimming later. Once you've got the right size, spray the glass with your soap and water solution. This will help the tint slide into place without sticking.
Now, carefully position the tint on the glass, starting from the top and working your way down. Use a squeegee to smooth out any air bubbles or wrinkles as you go. Once the tint is in place, trim the edges with a plastic scraper or knife for a clean finish.
Pro tip: Let the tint dry for at least 24-48 hours before rolling down the windows. This will give it enough time to adhere properly and avoid any shifting.
Tips for Preventing Future Bubbles
Now that your windows look as good as new, let's talk about how to prevent bubbles from happening again in the future. Here are a few tips to keep in mind:
- Invest in high-quality tint materials that are designed to resist bubbling and peeling.
- Make sure the tint is installed properly, with all edges sealed tightly to prevent moisture from getting in.
- Avoid exposing your car to extreme temperature changes, especially if it's parked outside for long periods.
- Regularly clean your windows and inspect the tint for any signs of damage or wear.
By following these tips, you can enjoy bubble-free tinted windows for years to come!
How Much Does It Cost to Fix?
Let's talk about the elephant in the room—cost. Fixing bubbles in tinted windows can vary depending on whether you do it yourself or hire a professional. DIYing it will save you a lot of money, but if you're not confident in your skills, it might be worth shelling out for a pro.
On average, hiring a professional to fix tinted window bubbles can cost anywhere from $100 to $500 per window, depending on the size and complexity of the job. If you choose to do it yourself, the cost will mainly come down to the price of new tint material and tools, which can range from $20 to $100.
Pro tip: Shop around for deals on tint materials and tools to save even more money!
Should You Go Pro?
So, you're probably wondering—should you tackle this job yourself or leave it to the professionals? The answer depends on your skill level and comfort with DIY projects.
If you're handy with tools and have some experience working with tint, going the DIY route can save you a ton of money. Plus, it's a great way to learn new skills and take pride in your work. However, if you're not confident in your abilities or don't have the time to dedicate to the project, hiring a professional might be the better option.
Just remember, if you do go pro, make sure to choose a reputable and experienced installer. Ask for references and check online reviews to ensure you're getting quality work.
FAQs About Fixing Tinted Window Bubbles
Still have questions? Here are some common FAQs about fixing bubbles in tinted windows:
Q: Can I just ignore the bubbles?
A: Not really. Bubbles can compromise the tint's effectiveness, reduce visibility, and even damage the glass over time. It's best to address the issue sooner rather than later.
Q: Can I fix bubbles without removing the tint?
A: Unfortunately, no. The only way to properly fix bubbles is to remove the old tint and start fresh. Trying to fix it without removing the tint will likely lead to more problems down the road.
Q: How long does the process take?
A: The time it takes to fix bubbles in tinted windows depends on the size of the window and the extent of the damage. On average, it can take anywhere from 1-3 hours per window.
Q: Will insurance cover the cost of fixing tinted window bubbles?
A: It depends on your insurance policy. Some policies may cover the cost if the damage was caused by an accident or weather-related issue. Check with your insurance provider to see if you're covered.
Q: Can I tint my windows myself?
A: Absolutely! With the right tools and materials, tinting your own windows is definitely doable. Just make sure to follow the instructions carefully and take your time.
And there you have it—everything you need to know about how to fix bubbles in tinted windows. Whether you're a DIY enthusiast or prefer to leave it to the pros, we hope this guide has given you the confidence and knowledge to tackle the job like a pro!
Kesimpulan
So, there you have it—the ultimate guide to fixing bubbles in tinted windows. From understanding the causes to mastering the techniques, you now have all the tools you need to tackle this common issue. Remember, fixing tinted window bubbles isn't just about aesthetics—it's also about safety and functionality.
We encourage you to share this article with your friends and family who might be dealing with the same problem. And if you have any questions or tips of your own, drop us a comment below. Together, we can make sure every car on the road has bubble-free tinted windows!
Happy tinting, and good luck with your project!
Golden Hour Piano Notes With Letters: Your Ultimate Guide To Melodic Bliss
Thunder Cage Mounting Reactor: Your Ultimate Guide To Power Solutions
Dave's Hot Chicken Fries Ingredients: The Ultimate Guide To Spicy Crispy Perfection

How to Get Rid of Ghost Touch Bubbles in Windows 10 & 11
When tinted windows are illegal. Funny
How to Get Bubbles Out of Tint Windows
