How To Draw A Mermaid Tale: A Step-by-Step Guide For Beginners
Let’s face it, drawing a mermaid tale is like crafting your own little slice of underwater magic. Whether you’re an aspiring artist, a hobbyist, or just someone who wants to add a splash of creativity to their day, learning how to draw a mermaid tale can be an exciting journey. From the shimmering scales to the elegant curves, this guide will take you step by step through the process, ensuring you create a masterpiece you’ll be proud of. So grab your pencils, erasers, and let’s dive into the world of mermaid art!
Drawing a mermaid tale might sound intimidating at first, but trust me, it’s not as scary as it seems. You don’t need to be a professional artist to get started. All you need is a bit of patience, some basic tools, and a willingness to learn. By the end of this guide, you’ll have the skills to create a stunning mermaid tale that looks like it belongs in an enchanted ocean.
Before we dive into the nitty-gritty details, let’s talk about why drawing a mermaid tale is such a cool skill to have. Mermaids have been a symbol of mystery and beauty for centuries, and their tails are often the most iconic part of their appearance. Mastering how to draw a mermaid tale can open up a whole new world of artistic possibilities, from creating your own illustrations to designing custom tattoos or even just doodling during boring meetings.
Read also:Dirty Chai Latte Vs Chai Latte The Ultimate Showdown For Coffee Lovers
What You’ll Need to Get Started
Alright, let’s get practical for a sec. Before you start sketching your dream mermaid tale, you’ll need a few essential tools. Don’t worry, they’re pretty basic and you probably already have most of them lying around:
- Pencils (HB, 2B, 4B for different shading options)
- An eraser (a kneaded eraser is ideal for fine details)
- Sketch paper or a drawing pad
- Colored pencils or markers (optional, if you want to add color)
- A ruler (optional, for straight lines if needed)
These tools will help you create a clean and polished drawing. If you’re just starting out, don’t stress too much about having the fanciest supplies. Focus on getting comfortable with the basics first.
Understanding the Anatomy of a Mermaid Tale
Now, let’s talk about the star of the show: the mermaid tale. Understanding its anatomy is crucial if you want to draw one that looks realistic and beautiful. Think of it like this: the tail is essentially a combination of a fish tail and a human leg, but with a touch of fantasy.
Key Features:
- The tail fin: This is the most prominent part of the tale and gives it that iconic mermaid look.
- The scales: These are what make the tale shimmer and shine, adding depth and texture to your drawing.
- The curves: A mermaid tale is all about fluid lines and graceful curves. Think of it like a dancer’s pose underwater.
Once you understand these elements, you’ll be able to create a tale that looks both natural and magical. And hey, who doesn’t want a bit of magic in their art?
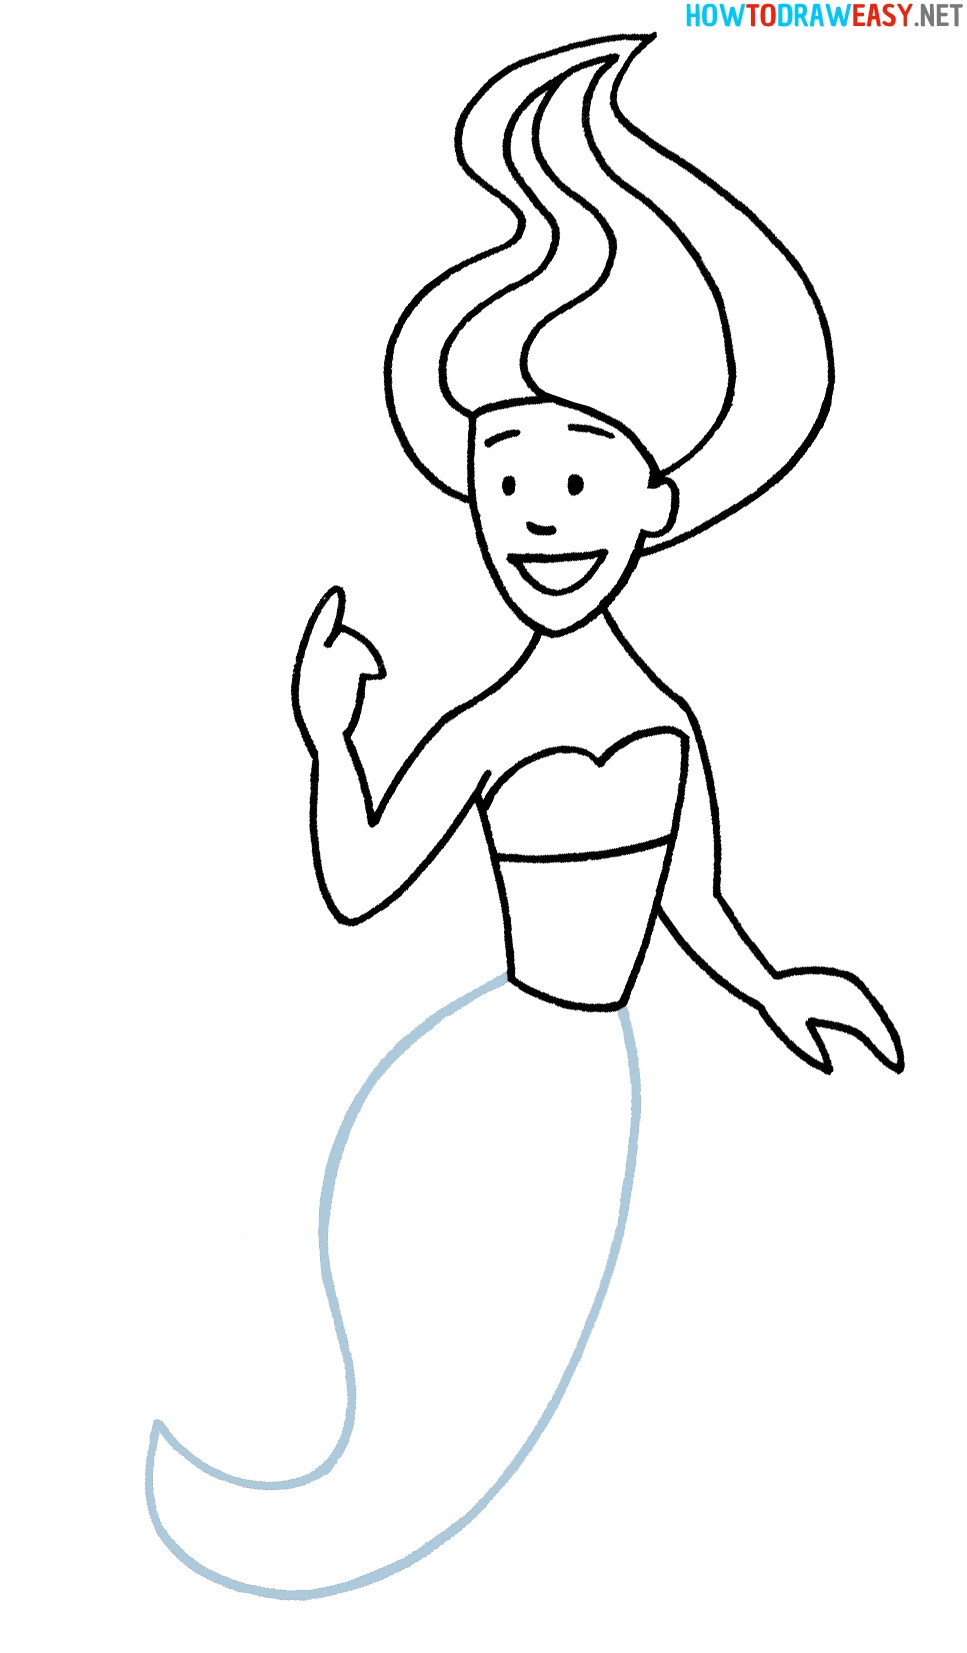
Step 1: Sketching the Basic Shape
The first step in learning how to draw a mermaid tale is to sketch the basic shape. Start with a simple outline of the tail. Imagine it as a teardrop shape with a wide base where the legs would be and a pointed end where the fin is located.
Read also:Black Widget Pictures Elevate Your Design Game With These Stunning Ideas
Here’s a quick tip: Use light strokes when sketching your initial outline. This way, you can easily erase any mistakes without leaving smudges on your paper. Remember, this is just the foundation, so don’t worry if it doesn’t look perfect at this stage.
Adding the Tail Fin
Once you have the basic shape down, it’s time to add the tail fin. Think of it as the crown jewel of your mermaid tale. The fin can be as simple or as elaborate as you like, depending on the style you’re aiming for.
For a classic look, draw a curved fin that extends from the top and bottom of the tail. If you want to get fancy, you can add extra flaps or spikes to give it a more dynamic appearance. Just remember to keep the lines smooth and flowing to maintain that mermaid vibe.
Step 2: Adding Scales
Alright, here comes the fun part: adding scales. Scales are what give a mermaid tale its unique texture and shimmer. But how do you draw them without making your drawing look like a fish out of water? Let me break it down for you:
Tips for Drawing Scales:
- Start by drawing a few large scales near the base of the tail. These will act as a guide for the rest of the scales.
- Gradually make the scales smaller as you move towards the tip of the tail. This creates a natural gradient effect.
- Overlap the scales slightly to give them depth and dimension. Think of them like tiles on a roof.
Don’t overthink it too much. Scales don’t have to be perfectly uniform. In fact, a bit of randomness can make your drawing look more realistic and organic.
Shading the Scales
Once you’ve drawn the scales, it’s time to bring them to life with shading. Shading adds depth and dimension to your drawing, making it pop off the page.
Here’s how you can do it:
- Identify the light source in your drawing. This will determine where the highlights and shadows should go.
- Use a darker pencil (like a 4B) to shade the areas where the scales overlap or where the tail curves inward.
- Leave some areas unshaded to create highlights, giving the illusion of light reflecting off the scales.
With a bit of shading, your mermaid tale will start to look like it belongs in an underwater kingdom.
Step 3: Adding Color
If you’re feeling adventurous, why not add a splash of color to your mermaid tale? Coloring can take your drawing to the next level, giving it that extra bit of magic. Here’s how you can do it:
Choosing Colors:
- Think about the mood you want to convey. Blue and green are classic choices for a serene underwater look, while pink and purple can add a touch of whimsy.
- Use a gradient effect to blend different colors seamlessly. This mimics the way light interacts with water, creating a beautiful ombre effect.
- Don’t forget to add highlights and shadows using lighter and darker shades of your chosen colors.
Coloring your mermaid tale can be as simple or as complex as you like. The key is to have fun with it and let your creativity flow.
Using Colored Pencils vs. Markers
When it comes to coloring your mermaid tale, you have a few options. Colored pencils are great for detailed work and allow you to build up layers of color gradually. Markers, on the other hand, are perfect for bold, vibrant colors and can cover larger areas quickly.
Experiment with both and see which one you prefer. Or, if you’re feeling daring, try combining them for a mixed-media effect. The possibilities are endless!
Step 4: Adding Details
Now that you’ve got the basic shape, scales, and colors down, it’s time to add those finishing touches that will make your mermaid tale truly unique. Think about the little details that can bring your drawing to life:
- Draw patterns on the scales, such as stripes or dots, to add visual interest.
- Add highlights to the tail fin to make it look like it’s catching the light.
- Sketch some seaweed or bubbles around the tail to create an underwater setting.
These small details can make a big difference in the overall look of your drawing. Don’t be afraid to experiment and see what works best for you.
Common Mistakes to Avoid
As with any new skill, there are a few common mistakes you might encounter while learning how to draw a mermaid tale. Here are a few to watch out for:
- Making the tail too stiff or angular. Remember, a mermaid tale should flow like water.
- Overloading the scales with too much detail. Sometimes less is more.
- Ignoring the light source when shading. This can make your drawing look flat and lifeless.
By being aware of these potential pitfalls, you can avoid them and create a drawing that truly shines.
How to Fix Mistakes
Mistakes happen, even to the best of us. The good news is, there are ways to fix them without starting from scratch:
- Use an eraser to gently lift off any unwanted pencil marks.
- If you’ve made a mistake with color, try layering a new color over it to cover it up.
- Don’t be afraid to redraw certain parts of your drawing if they’re not working for you.
Remember, every mistake is a learning opportunity. Embrace them and use them to improve your skills.
Conclusion
And there you have it, folks! Learning how to draw a mermaid tale might seem challenging at first, but with a bit of practice and patience, you can create something truly magical. From sketching the basic shape to adding scales, shading, and color, each step brings you closer to mastering this enchanting art form.
So what are you waiting for? Grab your pencils and start creating your own mermaid tale today! And don’t forget to share your masterpiece with the world. Who knows, you might just inspire someone else to dive into the world of mermaid art. Until next time, keep drawing and keep dreaming!
Table of Contents
- What You’ll Need to Get Started
- Understanding the Anatomy of a Mermaid Tale
- Step 1: Sketching the Basic Shape
- Step 2: Adding Scales
- Step 3: Adding Color
- Step 4: Adding Details
- Common Mistakes to Avoid
- Conclusion
What Does The Feeling When Knee Surgery Is Tomorrow Mean?
Coiffure Cheveux Long Fillette: Unlocking The Magic Of Long Hair Styles For Your Little Princess
Chevy Sonic Touch Screen Not Working: The Ultimate Guide To Diagnose And Fix

How to Draw a Mermaid Tail Easy and Fun

How to Draw a Mermaid Tail in 15 Easy Steps Artsydee Drawing
How to Draw a Mermaid Draw for Kids
