How To Easily And Quickly Cover A Cake: Step-by-Step Guide
Let’s face it, folks—covering a cake can be a daunting task if you don’t know the tricks of the trade. But guess what? It doesn’t have to be that complicated. With the right techniques, tools, and a little bit of patience, you can cover your cake like a pro in no time. Whether you’re a beginner baker or just someone who wants to impress friends and family, we’ve got you covered. In this guide, we’ll break down how to cover a cake easily and quickly so you can focus on the fun part—eating it!
Now, I know what you’re thinking—“is it really possible to make a cake look store-bought without spending hours on it?” The answer is a resounding YES. From choosing the right frosting to using simple tools, we’ll walk you through everything you need to know. So grab your apron, roll up your sleeves, and let’s dive in!
Before we get started, it’s important to note that baking isn’t just about following recipes; it’s about creating something beautiful and delicious. And covering a cake is the cherry on top (pun intended). So let’s make sure your cake looks as good as it tastes. Ready? Let’s go!
Read also:2 Braids Into A Ponytail The Ultimate Guide To Stylish Hair Transformation
Why Covering a Cake Matters
First things first—why does covering a cake even matter? Well, think about it this way: a naked cake might taste amazing, but it’s not exactly Instagram-worthy. Covering a cake gives it that polished, professional look that makes people go “wow.” Plus, it helps protect the cake from drying out and adds an extra layer of flavor. So yeah, it’s kinda important.
But here’s the good news—you don’t need fancy equipment or years of experience to achieve that perfect finish. With a few simple tips and tricks, you’ll be covering cakes like a boss in no time.
Tools You’ll Need to Cover a Cake Quickly
Before we dive into the nitty-gritty of how to cover a cake, let’s talk about the tools you’ll need. No, you don’t have to run out and buy a $500 set of professional baking tools (unless you want to). Here’s a list of essentials that’ll make your life a whole lot easier:
- A turntable—this is a game-changer for smoothing out frosting.
- A spatula—preferably an offset one for better control.
- A bench scraper—great for cleaning up edges and creating sharp lines.
- Plastic wrap or parchment paper—for preventing sticking.
- Your trusty mixing bowls and spatulas for making frosting.
See? Not too complicated, right? Now let’s move on to the fun stuff.
Choosing the Right Frosting
When it comes to covering a cake, the frosting is everything. You can have the most beautiful cake in the world, but if the frosting is lumpy or uneven, it’s not gonna cut it. So what kind of frosting should you use? Here are a few options:
Buttercream Frosting
This is the classic go-to for most bakers. Buttercream is easy to work with, tastes amazing, and can be customized in endless ways. Plus, it dries to a nice, smooth finish that’s perfect for covering cakes.
Read also:Wc Swearingen Recreation Area A Hidden Gem For Outdoor Enthusiasts
Chocolate Ganache
If you’re a chocolate lover, ganache is a great option. It’s rich, decadent, and gives your cake a glossy finish that’s hard to resist. Just be careful—it can be a bit tricky to work with if it’s too warm or too cold.
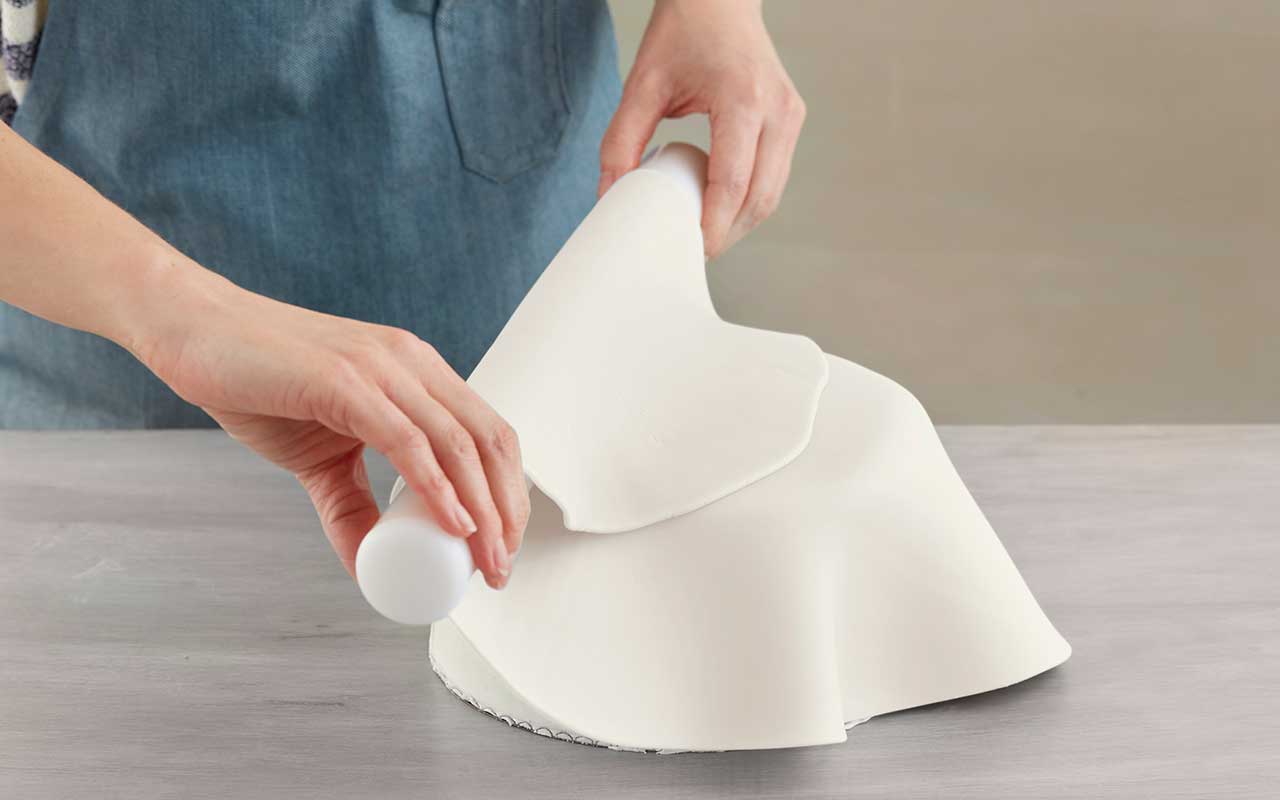
Fondant
Fondant might seem intimidating, but it’s actually pretty easy once you get the hang of it. It gives your cake a smooth, flawless finish and can be colored and shaped in countless ways. Just make sure you have enough time to work with it, as it can be a bit finicky.
So which one should you choose? Honestly, it depends on your personal preference and the look you’re going for. Experiment with different types of frosting to see what works best for you.
Step-by-Step Guide to Covering a Cake
Alright, now that we’ve covered the basics, let’s get into the step-by-step process of covering a cake. Follow these tips, and you’ll be a cake-covering pro in no time.
Step 1: Prepare Your Cake
Before you start frosting, make sure your cake is completely cooled. If it’s still warm, the frosting will melt and make a mess. You can also freeze your cake for a few hours to make it easier to handle.
Step 2: Crumb Coat
A crumb coat is a thin layer of frosting that seals in any loose crumbs and creates a smooth base for the final layer. Spread a thin layer of frosting over the entire cake, then chill it in the fridge for about 15-20 minutes.
Step 3: Apply the Final Layer
Once your crumb coat is set, it’s time to apply the final layer of frosting. Start at the top and work your way down, using a spatula to smooth out any bumps or lumps. Don’t worry if it’s not perfect—it’s supposed to be a little messy at this stage.
Step 4: Smooth It Out
This is where your turntable and spatula come in handy. Spin the cake slowly while holding the spatula steady to create a smooth, even layer of frosting. Use a bench scraper to clean up the edges and create sharp lines.
Step 5: Add Finishing Touches
Now that your cake is covered, it’s time to get creative. Add some decorations, sprinkles, or edible flowers to give it that extra wow factor. The possibilities are endless!
Tips for Covering a Cake Quickly
Let’s face it—sometimes you just don’t have time to spend hours on a cake. But that doesn’t mean you have to sacrifice quality. Here are a few tips for covering a cake quickly:
- Use pre-made frosting—it’s not cheating, I promise.
- Work in small sections to avoid mistakes.
- Don’t overthink it—sometimes a rustic, imperfect look is just as beautiful.
- Practice makes perfect, so don’t be afraid to experiment.
Remember, the goal is to have fun and create something delicious. If it’s not perfect, that’s okay—nobody’s gonna care once they take that first bite.
Common Mistakes to Avoid
Even the best bakers make mistakes sometimes. Here are a few common pitfalls to watch out for when covering a cake:
Using Too Much Frosting
More is not always better when it comes to frosting. Use just enough to cover the cake without making it too thick or heavy.
Not Chilling the Cake
If you skip the chilling step, your frosting is gonna melt and make a mess. Trust me, it’s worth the extra time.
Overworking the Frosting
Once the frosting is on the cake, try not to touch it too much. Overworking it can cause air bubbles and make it look uneven.
By avoiding these mistakes, you’ll save yourself a lot of headache and end up with a beautiful, professional-looking cake.
How to Troubleshoot Cake-Covering Problems
Let’s say you’ve followed all the steps, but something’s still not quite right. Don’t panic—here’s how to troubleshoot common cake-covering problems:
Cracks in the Frosting
This usually happens when the frosting is too cold or too stiff. Let it sit at room temperature for a few minutes, then try again.
Bumps and Lumps
Crumb coat is your best friend here. Make sure you’ve sealed in all the crumbs before applying the final layer.
Frosting Sliding Off
This can happen if the cake isn’t completely cooled or if the frosting is too warm. Chill the cake and frosting, then try again.
With a little troubleshooting, you’ll be back on track in no time.
Expert Tips for Advanced Bakers
If you’re feeling confident and want to take your cake-covering skills to the next level, here are a few expert tips:
Use a Piping Bag for Edges
A piping bag can help you create clean, sharp edges and add intricate details to your cake.
Experiment with Colors and Textures
Don’t be afraid to get creative with different colors and textures. Try using food coloring, sprinkles, or edible glitter to make your cake pop.
Practice on Dummy Cakes
Before you tackle a big event cake, practice on a smaller “dummy” cake to perfect your technique.
These tips will help you take your cake-covering skills to the next level and create cakes that look as good as they taste.
Conclusion: You’ve Got This!
So there you have it, folks—a comprehensive guide to covering a cake easily and quickly. Whether you’re a beginner or an experienced baker, these tips and tricks will help you create cakes that look professional and taste amazing.
Remember, the key to success is practice and patience. Don’t be afraid to make mistakes—they’re all part of the learning process. And most importantly, have fun with it! Baking is supposed to be enjoyable, so embrace the chaos and enjoy the process.
Now it’s your turn—grab your tools, fire up the oven, and start covering those cakes. And don’t forget to share your creations with us in the comments below. We’d love to see what you come up with!
Cut In Half Illusion Costume: The Ultimate Guide To Amaze And Impress
How To Make Your Brother Shut Up: The Ultimate Guide
How Much Sugar Is In A Monster Drink? Unveiling The Energy Drink's Sweet Truth

Cómo cubrir una torta con fondant How to cover a cake with fondant

Evelyn entre tortas ,cupcakes y más dulces Como cubrir una torta
Cómo Cubrir Una Torta Con Fondant Original & Profesional
