How To Take A Good Moon Picture On IPhone: The Ultimate Guide
**Ever wondered how those breathtaking moon shots are captured using just an iPhone?** You’re not alone! Millions of people around the globe want to know how to take a good moon picture on iPhone without breaking the bank for fancy equipment. In this guide, we’ll dive deep into tips, tricks, and techniques that will transform your iPhone into a moon photography powerhouse. So, grab your phone, and let’s get started!
Taking moon photos with an iPhone might seem intimidating at first, but trust me—it’s doable! With a few adjustments, the right settings, and some patience, you can capture stunning lunar images that will make your friends hit that like button on Instagram. This guide isn’t just about snapping pics; it’s about understanding your device and unlocking its full potential.
Whether you’re a beginner or someone who’s been experimenting with iPhone photography for a while, this article will help you level up your skills. By the end of it, you’ll be armed with actionable advice and practical steps to turn your iPhone into a professional-grade moon shooter. Let’s dive in!
Read also:Clown Pose Reference The Ultimate Guide To Perfecting Your Clown Character
Table of Contents
Understanding the Basics of iPhone Moon Photography
Adjusting Your iPhone Camera Settings for Moon Shots
Pro Tips for Capturing the Perfect Moon Photo
Using Third-Party Apps to Enhance Your Moon Pics
Mastering Lighting for Moon Photography
Essential Accessories for Better Moon Photos
Read also:Do You Need A Coax Cable For Xfinity Wifi The Ultimate Guide
Creating Stunning Compositions in Your Moon Shots
Editing Your Moon Photos Like a Pro
Common Mistakes to Avoid When Taking Moon Pics
Frequently Asked Questions About Moon Photography on iPhone
Understanding the Basics of iPhone Moon Photography
Before we jump into the nitty-gritty, let’s break down the basics of how to take a good moon picture on iPhone. The moon is a tricky subject because it’s so bright against a dark sky, and your iPhone’s camera has limitations. But don’t worry! Here’s what you need to know:
Your iPhone’s camera is designed to capture everyday scenes, but with a little tweaking, it can handle moon photography like a champ. The key lies in understanding exposure, focus, and lighting conditions. Most iPhones come equipped with advanced features like Night Mode, HDR, and Smart HDR, which can be leveraged for moon shots.
Why Is Moon Photography Challenging?
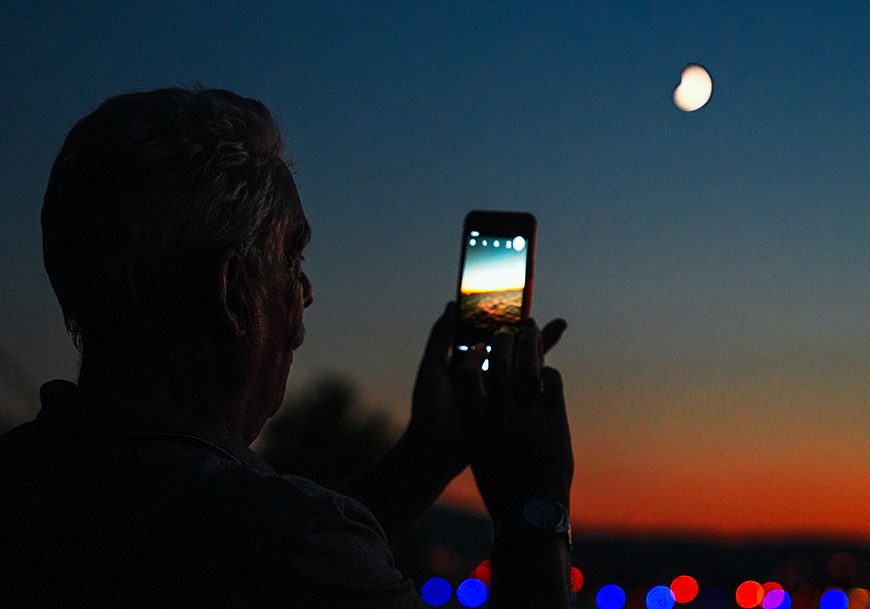
Here’s the deal: the moon is super bright, even when it looks dim to the naked eye. When you point your iPhone at the moon, the camera often struggles to balance the brightness of the moon with the darkness of the sky. This results in overexposed or blurry images. To avoid this, you’ll need to manually adjust your settings.
Adjusting Your iPhone Camera Settings for Moon Shots
Now that you understand the basics, let’s talk about how to adjust your iPhone’s camera settings for better moon pictures. By tweaking these settings, you can take control of your photography and produce stunning results.
Step 1: Lock the Exposure
Tap on the moon in the camera viewfinder and hold your finger until you see "AE/AF Lock" appear. This locks the exposure and focus, preventing your iPhone from automatically adjusting as you move the camera. It’s crucial for capturing sharp, well-lit moon shots.
Step 2: Adjust the Exposure Slider
Once AE/AF Lock is enabled, slide the exposure slider down to reduce the brightness. The moon might look darker on the screen, but trust the process. This ensures the details of the moon’s surface are visible in your final image.
Pro Tips for Capturing the Perfect Moon Photo
Ready to level up your moon photography game? Here are some pro tips to help you capture the perfect shot:
- Use Burst Mode: Take multiple shots in quick succession to increase your chances of getting a sharp image.
- Steady Your Hands: Hold your iPhone steady or use a tripod to avoid blurry shots.
- Shoot During Twilight: The best time to capture the moon is during twilight when the sky is still slightly bright, making the moon stand out.
- Zoom In Moderately: Use the digital zoom sparingly, as it can reduce image quality. Stick to 2x or 3x zoom for the best results.
Using Third-Party Apps to Enhance Your Moon Pics
While your iPhone’s built-in camera app is powerful, third-party apps can take your moon photography to the next level. Here are a few apps worth checking out:
1. ProCamera
ProCamera offers advanced manual controls for exposure, focus, and white balance. It’s perfect for fine-tuning your moon shots and achieving professional results.
2. NightCap Pro
NightCap Pro specializes in low-light photography and includes features like long exposure and manual focus. It’s ideal for capturing detailed moon images.
3. Halide
Halide provides a clean interface and professional-grade tools for adjusting settings like ISO and shutter speed. It’s great for photographers who want precise control over their shots.
Mastering Lighting for Moon Photography
Lighting is everything in moon photography. Here’s how to master it:
The moon reflects sunlight, so its brightness depends on its phase. A full moon is the brightest, while a crescent moon is dimmer. Knowing the moon’s phase helps you plan your shoot and adjust your settings accordingly.
How to Use Natural Light
Shoot during twilight or when the moon is low on the horizon. The ambient light from the sky can help balance the exposure and create a more dynamic image.
Essential Accessories for Better Moon Photos
While your iPhone can capture great moon shots on its own, a few accessories can enhance your experience:
1. Tripod
A tripod stabilizes your iPhone, reducing blur and allowing for longer exposures. It’s a must-have for serious moon photography.
2. Telephoto Lens
A telephoto lens attachment can magnify the moon and bring out more detail. Just be mindful of image quality loss with some third-party lenses.
3. Remote Shutter
A remote shutter lets you take photos without touching your iPhone, minimizing camera shake and ensuring sharp images.
Creating Stunning Compositions in Your Moon Shots
Great photography isn’t just about technical skills—it’s also about composition. Here’s how to create stunning moon compositions:
1. Add Foreground Elements
Incorporate trees, buildings, or mountains into your shot to add context and depth. This makes your moon photos more interesting and engaging.
2. Experiment with Angles
Try shooting from different angles and perspectives to find the most visually appealing composition. Don’t be afraid to get creative!
Editing Your Moon Photos Like a Pro
Editing is the final step in creating breathtaking moon photos. Here’s how to edit your shots like a pro:
Use apps like Snapseed or Adobe Lightroom to adjust brightness, contrast, and sharpness. Enhance the moon’s details by increasing clarity and reducing noise. But remember—less is more! Over-editing can make your photos look unnatural.
Top Editing Tips
- Boost contrast to make the moon stand out against the dark sky.
- Adjust highlights and shadows to balance the exposure.
- Use the brush tool to enhance specific areas of the image.
Common Mistakes to Avoid When Taking Moon Pics
Even the best photographers make mistakes. Here are some common ones to avoid:
- Overusing Zoom: Digital zoom reduces image quality. Stick to moderate zoom levels.
- Shooting in Auto Mode: Auto mode often overexposes the moon. Use manual controls for better results.
- Ignoring Lighting Conditions: Poor lighting can ruin your shot. Plan your shoot around optimal lighting times.
Frequently Asked Questions About Moon Photography on iPhone
Still have questions? Here are some common FAQs:
Q: Can I use Night Mode for moon photography?
A: While Night Mode is great for low-light photography, it’s not ideal for moon shots. The moon’s brightness can confuse the camera, resulting in overexposed images. Stick to manual settings for better control.
Q: Do I need a telephoto lens?
A: A telephoto lens can enhance your moon shots, but it’s not necessary. With careful composition and editing, you can still capture stunning images without one.
Q: What’s the best time to shoot the moon?
A: The best time is during twilight or when the moon is low on the horizon. This provides optimal lighting conditions for capturing sharp, detailed images.
Conclusion
Taking a good moon picture on iPhone doesn’t have to be rocket science. With the right techniques, settings, and accessories, you can capture stunning lunar images that will impress anyone. Remember to experiment, practice, and have fun!
Now that you’ve learned the secrets of moon photography, it’s time to put them into action. Grab your iPhone, head outside, and start shooting. Don’t forget to share your favorite moon photos in the comments below or tag us on social media. Happy shooting!
How To Prioritize Devices On WiFi Xfinity: The Ultimate Guide For A Smoother Connection
Cybertruck Bed Open: The Ultimate Guide To Tesla's Revolutionary Pickup
How To Draw Santa Claus: A Fun And Easy Guide For Everyone
How to Take Pictures of the Moon with iPhone

How do you actually take a good moon picture with iphone? r/iphone
![[100+] Moon Iphone Wallpapers](https://wallpapers.com/images/featured/moon-iphone-d2fcays41n3014ht.jpg)
[100+] Moon Iphone Wallpapers
