How To Change A Ryobi Drill Bit: A Comprehensive Guide For DIY Enthusiasts
Ever wondered how to change a Ryobi drill bit like a pro? Well, you're in the right place! Changing a drill bit might seem intimidating at first, but trust me, it's a breeze once you get the hang of it. Whether you're a seasoned handyman or just starting out with DIY projects, this guide will walk you step by step through the process. So, grab your Ryobi drill and let's dive in!
There’s nothing quite like the satisfaction of completing a DIY project with precision. But before you can drill that perfect hole, you need to know how to switch out those bits. Don’t worry if you’ve never done it before. We’ll break it down into simple steps so even a complete beginner can master it in no time. Plus, we’ll share some pro tips to make your drilling experience smoother than ever.
Now, let’s talk about why learning how to change a Ryobi drill bit is so important. Whether you're working on wood, metal, or masonry, having the right bit makes all the difference. This guide will teach you everything you need to know to ensure your projects turn out perfectly every time. So, let’s get started!
Read also:How To Cut A Habanero Pepper A Spicy Guide To Mastering The Heat
Understanding Your Ryobi Drill
Before we dive into the nitty-gritty of changing bits, it’s essential to understand your Ryobi drill. These drills are designed for versatility and ease of use, making them a favorite among DIY enthusiasts and professionals alike. Most Ryobi drills come equipped with a keyless chuck, which allows for quick and easy bit changes without needing extra tools. Cool, right?
Here’s a quick breakdown of what you need to know about your Ryobi drill:
- Keyless chuck system for effortless bit changes
- Compatible with a wide range of drill bits for various materials
- Compact and lightweight design for easy handling
- Variable speed settings for precision drilling
Knowing these basics will help you navigate the process of changing bits more confidently. Now, let’s move on to the fun part!
Why Change a Ryobi Drill Bit?
Changing drill bits isn’t just about convenience; it’s about getting the job done right. Different materials require different types of bits to ensure clean and accurate holes. For instance, a wood bit won’t cut it (pun intended) when drilling into metal. By learning how to change your Ryobi drill bit, you’ll be able to tackle a variety of projects with ease.
Here are some common scenarios where changing a bit is necessary:
- Switching from wood to metal or masonry work
- Drilling holes of different sizes
- Using specialty bits for specific tasks
So, whether you’re building furniture, hanging shelves, or installing fixtures, having the right bit for the job will make all the difference.
Read also:Clay Heart Tray The Perfect Blend Of Art And Functionality
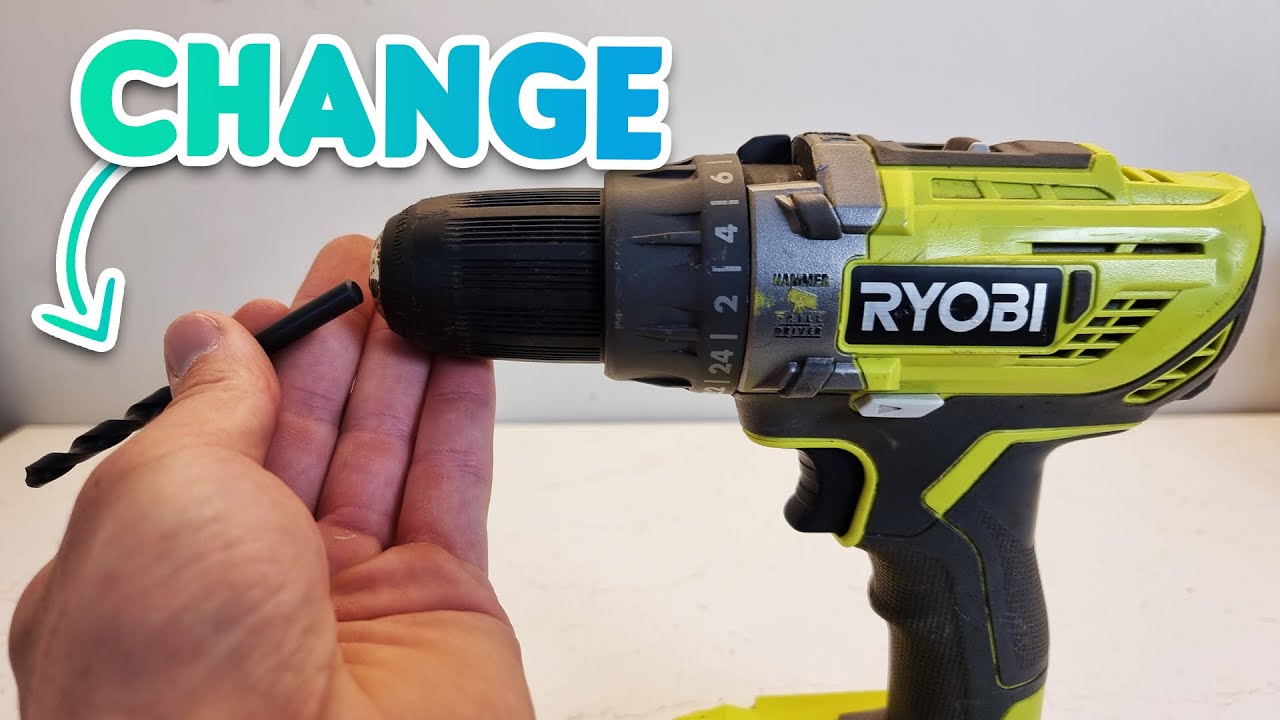
Step-by-Step Guide: How to Change a Ryobi Drill Bit
Now that you know why changing bits is important, let’s get into the actual process. Follow these simple steps to change a Ryobi drill bit like a pro:
Step 1: Turn Off Your Drill
Safety first, folks! Always make sure your Ryobi drill is turned off before attempting to change the bit. This will prevent any accidental starts that could lead to injury. Trust me, you don’t want to learn this lesson the hard way.
Step 2: Grip the Chuck
Hold the chuck of your Ryobi drill firmly with one hand. The chuck is the part that holds the drill bit in place. If you’re using a cordless model, you can use the drill itself for stability.
Step 3: Loosen the Chuck
Rotate the chuck counterclockwise to loosen it. Most Ryobi drills have a keyless chuck, so you can do this by hand. If it feels a bit tight, don’t worry; just apply a little more pressure. You’ll get the hang of it in no time.
Step 4: Remove the Old Bit
Once the chuck is loose, gently pull the old bit out. If it’s stuck, try wiggling it back and forth to loosen it. Remember, patience is key here. Rushing could damage the chuck or the bit itself.
Step 5: Insert the New Bit
Now it’s time to insert the new bit. Slide it into the chuck until it’s snug. Make sure the bit is centered and aligned properly to ensure smooth operation.
Step 6: Tighten the Chuck
Rotate the chuck clockwise to tighten it around the new bit. You want it to be secure but not overly tight. A good rule of thumb is to tighten it until you can’t turn it anymore by hand.
Step 7: Test the Bit
Before you start drilling, give the new bit a quick test. Turn on the drill and let it run for a few seconds to ensure the bit is secure and spinning smoothly. If everything looks good, you’re ready to start your project!
Common Mistakes to Avoid
While changing a Ryobi drill bit is relatively straightforward, there are a few common mistakes to watch out for:
- Not tightening the chuck enough, which can cause the bit to slip during use
- Over-tightening the chuck, which can damage the chuck or make it harder to remove the bit later
- Using the wrong type of bit for the material you’re working with
Avoiding these mistakes will help ensure your drilling projects go smoothly and efficiently.
Tips for Maintaining Your Ryobi Drill
Proper maintenance is key to keeping your Ryobi drill in top condition. Here are a few tips to keep in mind:
- Regularly clean the chuck and bits to prevent buildup of debris
- Store your drill and bits in a dry, safe place to prevent rust and damage
- Inspect your bits regularly for wear and tear, and replace them as needed
By following these tips, you’ll extend the life of your Ryobi drill and ensure it’s always ready for your next project.
Choosing the Right Drill Bit
Selecting the right drill bit is crucial for achieving the best results. Here’s a quick guide to help you choose the perfect bit for your project:
Types of Drill Bits
There are several types of drill bits available, each designed for specific materials and tasks:
- Twist Bits: Ideal for drilling into wood, plastic, and metal
- Brad Point Bits: Perfect for clean, precise holes in wood
- Masonry Bits: Designed for drilling into brick, concrete, and stone
- Hole Saws: Great for creating large holes in wood or metal
Knowing the right bit for your material will help you achieve professional results every time.
Advanced Techniques for Changing Bits
Once you’ve mastered the basics, you can explore some advanced techniques to make the process even smoother:
Using a Chuck Key
While most Ryobi drills have a keyless chuck, some older models may require a chuck key. If you have one of these, simply insert the key into the chuck and turn it clockwise or counterclockwise to tighten or loosen the bit.
Quick-Release Systems
Some Ryobi models come equipped with quick-release systems, allowing you to change bits in seconds. If you have one of these, take advantage of it to speed up your workflow.
Conclusion
And there you have it—everything you need to know about how to change a Ryobi drill bit! By following these simple steps, you’ll be able to tackle any drilling project with confidence and precision. Remember, practice makes perfect, so don’t be afraid to experiment with different bits and techniques.
Now it’s your turn! Share your experiences with changing Ryobi drill bits in the comments below. Have any tips or tricks to add? Let us know! And don’t forget to check out our other DIY guides for more helpful tips and tricks. Happy drilling!
Table of Contents
- Understanding Your Ryobi Drill
- Why Change a Ryobi Drill Bit?
- Step-by-Step Guide: How to Change a Ryobi Drill Bit
- Common Mistakes to Avoid
- Tips for Maintaining Your Ryobi Drill
- Choosing the Right Drill Bit
- Advanced Techniques for Changing Bits
- Conclusion
Creative And Adorable Ideas For Your Cute Graduation Poster
How To Take Out A Headlight: The Ultimate Guide For DIY Enthusiasts
Who Are The Next Coaches For The Voice? A Sneak Peek Into Season 24 And Beyond

How To Change Drill Bit Ryobi? ( Easy Short Tutorial ) Healing Picks

RYOBI DRILL BIT SET Able Auctions
How To Remove Drill Bit From Ryobi Drill? ToolCraftz
