How To Draw Flames Of Fire: A Step-by-Step Guide For Fire Enthusiasts
So here we are, ready to dive into the world of fiery art. Drawing flames of fire might seem intimidating at first, but trust me, it’s all about breaking it down into manageable steps. Whether you’re an aspiring artist or just someone who wants to add that extra spark to their doodles, this guide has got you covered. We’ll explore everything from basic techniques to advanced tips that’ll make your flames pop off the page. let's jump right in and ignite your creativity yeah?
Fire has always been a powerful symbol in art, representing passion, energy, and even destruction. When you learn how to draw flames of fire, you're not just creating shapes—you're bringing emotion to life. And hey, don’t worry if you’re a beginner. This article is designed to help everyone, no matter where they’re starting from. So grab your pencil, paper, and maybe a cup of coffee, because we’re about to get our hands dirty—or should I say smoky?
Before we dive deeper, let me tell you something cool. Did you know that drawing flames of fire is one of the most rewarding skills you can master? It’s like learning a secret language that speaks directly to the soul. By the end of this guide, you’ll be able to create dynamic, realistic flames that look like they’re ready to leap off the page. Ready to light up your artistic journey? Let’s go!
Read also:Why Your Gpu Fans Stop Spinning A Deep Dive Into The Problem
Understanding the Basics of Fire Flames
First things first, before you start sketching those fiery masterpieces, it’s important to understand what makes flames tick. Fire isn’t just random scribbles; it follows certain patterns and movements that give it its unique character. Think about it like choreography for flames—there’s a rhythm and flow that brings them to life. So let’s break it down.
What Makes Flames Unique?
Flames are all about contrast and movement. They have a mix of bright, intense colors at the core, fading into softer, cooler tones as they rise. The key to drawing realistic flames is capturing this gradient effect. Here’s a quick rundown:
- Core Flames: These are the hottest parts, usually orange and yellow.
- Outer Flames: As they rise, flames cool down and take on shades of red and blue.
- Smoke Trails: Don’t forget the wispy trails that give flames their ethereal quality.
By understanding these elements, you’ll be able to create flames that look alive and dynamic. It’s not just about the colors though; it’s about how they interact with each other. Think of it like a dance between heat and smoke. Cool right?
Tools You’ll Need to Draw Flames of Fire
Alright, now that you’ve got the theory down, let’s talk about the tools you’ll need to bring your flames to life. You don’t need anything fancy to start—just some basics will do the trick. Here’s what you’ll need:
Essential Drawing Supplies
- Pencils: Start with a regular HB pencil for sketching, then move on to darker ones like 2B or 4B for shading.
- Colored Pencils: Get a set with warm tones like red, orange, and yellow for those fiery vibes.
- Blending Tools: A blending stump or tortillon will help smooth out your gradients.
- Eraser: A kneaded eraser is perfect for softening edges and creating highlights.
And that’s it! You don’t need expensive materials to create stunning flames. It’s all about technique and practice. Now let’s move on to the fun part—actually drawing those flames!
Step-by-Step Guide to Drawing Flames of Fire
Ready to put pencil to paper? Let’s break down the process into simple, manageable steps. By following this guide, you’ll be able to create flames that look like they’re straight out of a fantasy novel. Here we go!
Read also:Cross Tattoo With Psalms 23 A Spiritual Journey Through Ink
Step 1: Sketch the Base Shape
Start by lightly sketching the basic shape of your flame. Think of it like a cloud with pointed edges. Use soft, flowing lines to create the foundation. Don’t worry about perfection at this stage; it’s all about getting the general shape down.
Step 2: Add Layers and Movement
Once you’ve got the base, start adding layers to give your flame depth. Draw smaller, curving shapes within the larger one to create the illusion of movement. Remember, flames are never static—they’re constantly shifting and dancing.
Step 3: Define the Core
Now it’s time to focus on the core of the flame. This is where the heat is concentrated, so use darker shades of orange and yellow to emphasize this area. Gradually blend into lighter tones as you move outward.
Step 4: Blend and Smooth
Use your blending tools to smooth out the transitions between colors. This is where your flame starts to look realistic. Take your time with this step—it’s what separates a good flame from a great one.
Step 5: Add Highlights and Details
Finally, add highlights to bring your flame to life. Use a white pencil or eraser to create small, bright spots that catch the light. These details will make your flame pop off the page. And there you have it—your very own masterpiece!
Advanced Techniques for Realistic Flames
Once you’ve mastered the basics, it’s time to level up your skills. Advanced techniques can take your flames to the next level, making them look even more realistic and dynamic. Let’s explore some tips and tricks to refine your craft.
Tips for Creating Dynamic Flames
- Experiment with Different Shapes: Flames don’t have to follow a specific pattern. Try mixing sharp, jagged edges with smooth, flowing curves for variety.
- Play with Colors: Don’t be afraid to push the boundaries with your color palette. Adding unexpected hues like purple or green can create interesting effects.
- Practice Shading: The more you practice shading, the better your flames will look. Pay attention to how light interacts with the flames and adjust accordingly.
These techniques might take some time to master, but trust me, the results are worth it. The more you practice, the more confident you’ll become in your ability to create stunning flames.
Common Mistakes to Avoid When Drawing Flames
Even the best artists make mistakes, but the key is learning from them. Here are some common pitfalls to watch out for when drawing flames:
Don’t Overdo the Details
While details are important, too many can overwhelm your flame. Focus on the big picture first, then add details sparingly where they’ll have the most impact.
Be Mindful of Proportions
Flames should look natural and balanced. If one part of your flame is too large or small compared to the rest, it can throw off the entire composition.
Avoid Hard Edges
Flames are all about fluidity and movement. Hard, sharp edges can make your flames look stiff and unnatural. Use soft, flowing lines instead.
By avoiding these common mistakes, you’ll be well on your way to creating flames that look authentic and dynamic.
Inspiration from Nature and Art
One of the best ways to improve your flame-drawing skills is by looking to nature and art for inspiration. Observing real flames and studying the works of other artists can provide valuable insights into how flames behave and how they can be depicted.
Study Real Flames
Take some time to observe real flames in action. Whether it’s a candle flame or a bonfire, pay attention to how the flames move, change color, and interact with their surroundings. These observations will inform your drawings and make them more realistic.
Explore Artistic Styles
Don’t limit yourself to one style of flame. Explore different artistic styles, from realistic to abstract, to see what resonates with you. You might be surprised at how much you can learn from experimenting with new techniques.
By combining inspiration from nature and art, you’ll develop a unique style that sets your flames apart from the rest.
How to Incorporate Flames into Your Art
Now that you know how to draw flames, it’s time to think about how you can incorporate them into your artwork. Flames can add excitement and drama to any piece, whether it’s a portrait, landscape, or abstract design.
Flames in Portraits
Adding flames to a portrait can give it an edgy, mysterious vibe. Think about how flames can enhance the subject’s expression or mood. Maybe they’re holding a torch, or their hair is on fire—literally! The possibilities are endless.
Flames in Landscapes
Flames can also be a powerful element in landscapes. Imagine a fiery sunset or a forest ablaze. Flames can add depth and intensity to your scenery, drawing the viewer into the scene.
By integrating flames into your art in creative ways, you’ll keep your audience engaged and excited to see what you create next.
Conclusion: Ignite Your Creative Fire
And there you have it—a comprehensive guide to drawing flames of fire. From understanding the basics to mastering advanced techniques, you now have the tools and knowledge to create stunning flames that captivate your audience. Remember, practice makes perfect, so keep honing your skills and experimenting with new ideas.
So what are you waiting for? Grab your pencils and start drawing those flames. And don’t forget to share your creations with the world. Whether it’s on social media or in person, showing off your work is the best way to inspire others and grow as an artist. Keep the fire burning, and happy drawing!
Table of Contents
- Understanding the Basics of Fire Flames
- Tools You’ll Need to Draw Flames of Fire
- Step-by-Step Guide to Drawing Flames of Fire
- Advanced Techniques for Realistic Flames
- Common Mistakes to Avoid When Drawing Flames
- Inspiration from Nature and Art
- How to Incorporate Flames into Your Art
- Flames in Portraits
- Flames in Landscapes
- Conclusion: Ignite Your Creative Fire
Rainbow Chow Chow Panda: The Cutest Canine Companion You’ll Ever Meet
Crown Apple Mimosa: The Ultimate Sparkling Celebration Drink
Exploring The Iconic Corner Of 4th And Fremont Street: A Journey Through Time And Culture
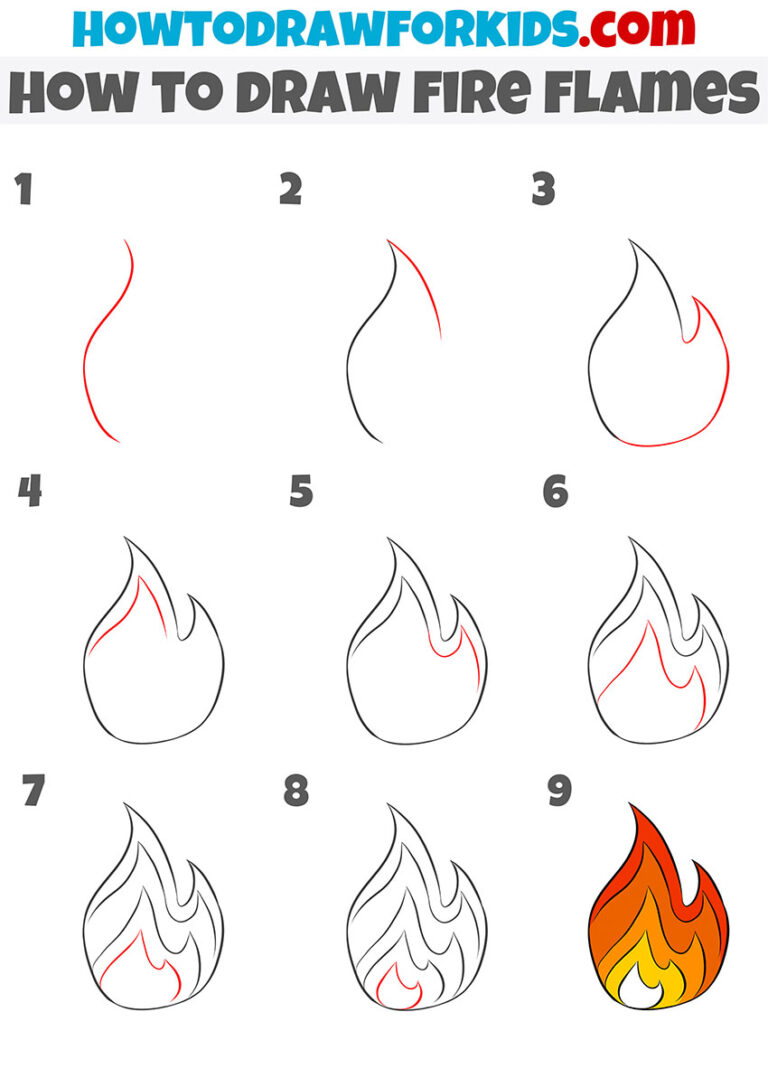
How to Draw Fire Flames Easy Drawing Tutorial For Kids

How to Draw Flames 14 Steps (with Pictures) wikiHow

How to Draw Flames 14 Steps (with Pictures) wikiHow
