How To Draw A Witch Hat: A Spooky, Step-by-Step Guide For All Skill Levels
Alright, friends, let’s dive into something super fun and slightly magical today! If you’ve ever wondered how to draw a witch hat, you’re in the right place. Whether you’re a total beginner or a seasoned artist, this guide will take you step by step through the process of creating a classic witch hat that’s perfect for Halloween, fantasy art, or just because it’s cool. So grab your pencils, erasers, and some paper, and let’s get witchy, shall we
Now, before we jump into the nitty-gritty details, let’s talk about why drawing a witch hat is such a great skill to learn. Witch hats are iconic symbols of magic, mystery, and creativity. They’re also surprisingly versatile in design, which means you can add your own flair once you’ve mastered the basics. From spooky to cute, there’s no limit to how you can personalize your witch hat drawings.
And hey, if you’re here because you’re planning a Halloween project or just want to spice up your art portfolio, you’re in for a treat. This guide isn’t just about drawing a witch hat—it’s about unlocking your artistic potential and having fun while doing it. So, are you ready to channel your inner witch? Let’s go!
Read also:Lemme Curb Review The Ultimate Guide To Mastering Modern Home Design
Why Learning How to Draw a Witch Hat is Worth Your Time
Let’s face it—witch hats are everywhere. From books and movies to costumes and decorations, these pointy hats have become a staple in pop culture. But why should you bother learning how to draw one? Well, for starters, it’s an excellent way to practice your drawing skills. Witch hats have simple shapes that are perfect for beginners, but they also offer opportunities for advanced artists to experiment with shading, textures, and details.
Plus, mastering the art of drawing a witch hat can open up a world of creative possibilities. You can use it as a standalone piece, incorporate it into larger illustrations, or even design your own magical characters. And let’s not forget the satisfaction of creating something entirely from scratch. There’s nothing quite like holding up your finished artwork and saying, “I did that!”
The Basics: Understanding the Witch Hat Structure
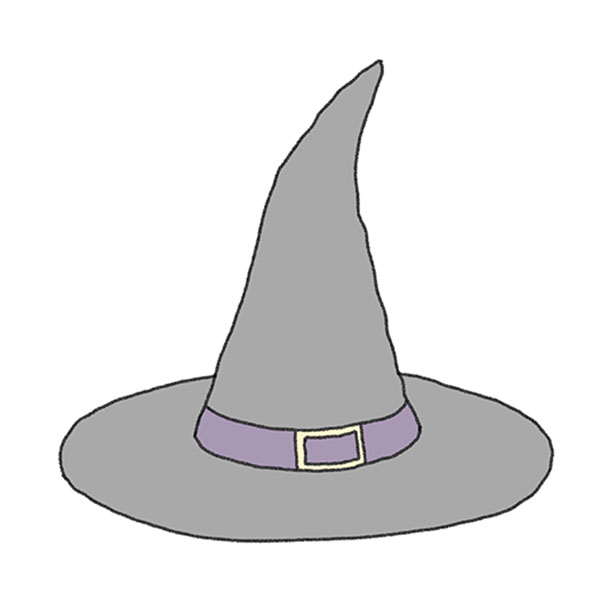
Before we start sketching, it’s important to understand the anatomy of a witch hat. At its core, a witch hat is a cone-shaped hat with a wide brim. The cone is usually tall and pointy, while the brim can vary in size and style. Some witch hats have flat brims, while others have curved or ruffled edges. Knowing these basic elements will help you create a more realistic and visually appealing drawing.
Key Features of a Witch Hat
- Conical Shape: The cone is the most defining feature of a witch hat. It’s typically tall and tapers to a sharp point at the top.
- Brim: The brim is the circular or oval part that surrounds the base of the cone. It can be flat, curved, or decorated with patterns.
- Details: Many witch hats have additional features like buckles, ribbons, or magical symbols. These details can add personality to your drawing.
Now that you know what makes a witch hat unique, let’s move on to the next step: gathering your materials.
What You’ll Need to Draw a Witch Hat
Here’s the good news: you don’t need a fancy art studio to draw a witch hat. In fact, all you really need are a few basic supplies. Let’s break it down:
- Pencil: A regular HB pencil is perfect for sketching the initial outlines.
- Eraser: Mistakes happen, and that’s okay! A soft eraser will help you clean up your lines without damaging the paper.
- Paper: Any type of drawing paper will work, but if you’re planning to add color, consider using thicker paper to prevent bleeding.
- Markers or Colored Pencils: Once your sketch is complete, you can bring your witch hat to life with color. Black is the classic choice, but feel free to experiment with other shades!
Got everything ready? Great! Let’s get started with the step-by-step process.
Read also:Cryomancer Build Dungeonborne Unlock The Frosty Power Within
Step-by-Step Guide: How to Draw a Witch Hat
Now comes the exciting part—actually drawing the witch hat! Follow these simple steps, and you’ll have a beautiful witch hat in no time.
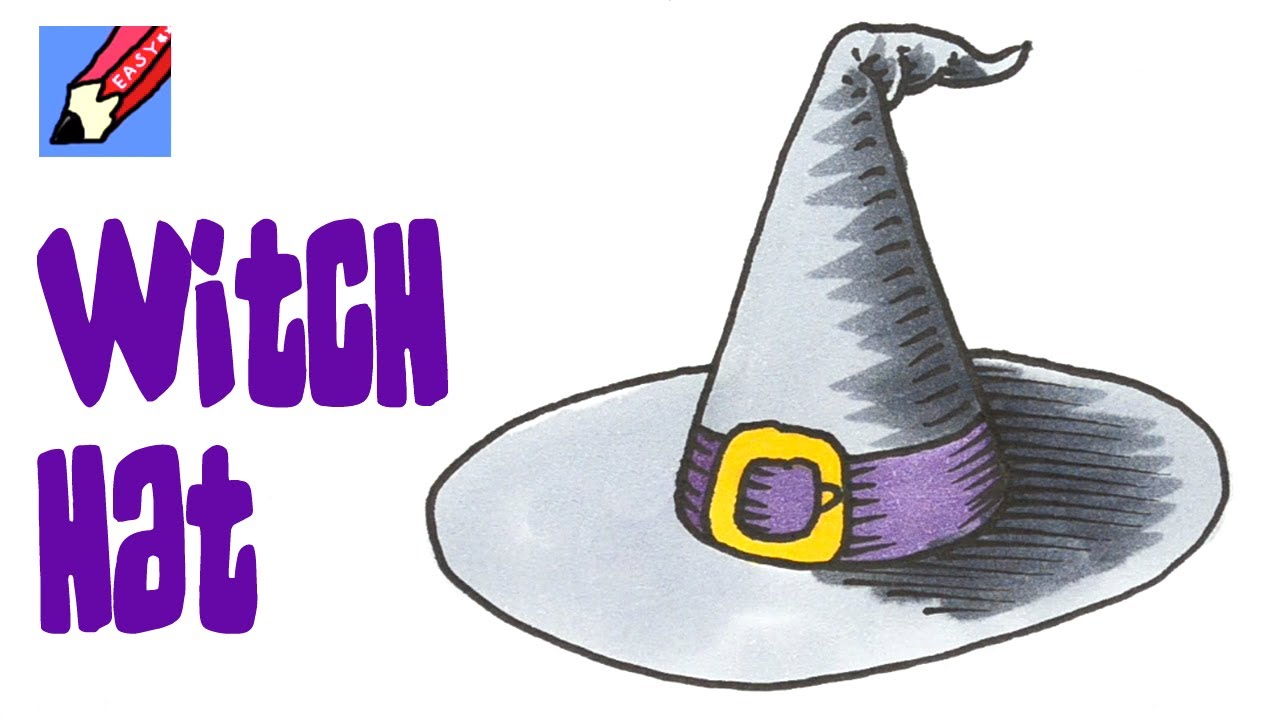
Step 1: Sketch the Cone
Begin by drawing a tall, triangular shape for the cone. Make sure the top of the triangle is sharp and pointed. Don’t worry about perfection at this stage; you can refine the lines later. Think of the cone as the spine of your witch hat—it’s the foundation for everything else.
Step 2: Add the Brim
Once your cone is in place, draw a circle or oval around the base of the cone to create the brim. The brim can be as wide or narrow as you like, so feel free to experiment with different sizes. If you want a more dynamic look, try giving the brim a slight curve or ripple.
Step 3: Refine the Lines
Now it’s time to clean up your sketch. Use your eraser to remove any unnecessary lines and make sure the edges of the cone and brim are smooth and even. This is also a good opportunity to adjust the proportions if needed.
Step 4: Add Details
No witch hat is complete without some personality! Add details like a buckle at the base of the cone, a ribbon around the brim, or even a few magical symbols. These small touches can make your drawing stand out and give it that extra bit of charm.
Step 5: Shade and Color
Finally, it’s time to bring your witch hat to life with shading and color. Use a black marker or colored pencil to fill in the hat, adding shadows to give it depth and dimension. If you’re feeling adventurous, try using different shades of gray or even metallic colors for a unique look.
Tips and Tricks for Drawing a Perfect Witch Hat
Here are a few extra tips to help you take your witch hat drawings to the next level:
- Practice Symmetry: A well-balanced witch hat looks much more polished, so take your time to ensure the cone and brim are evenly proportioned.
- Experiment with Styles: Don’t be afraid to try different styles, such as gothic, vintage, or whimsical. The possibilities are endless!
- Use Reference Images: If you’re stuck, look up some witch hat images online for inspiration. This can help you visualize different designs and techniques.
Remember, the key to improving your drawing skills is practice. The more you draw, the better you’ll get. So keep experimenting and having fun!
Common Mistakes to Avoid When Drawing a Witch Hat
Even the best artists make mistakes, but by being aware of common pitfalls, you can avoid them and create a more polished drawing. Here are a few things to watch out for:
- Uneven Proportions: Make sure the cone and brim are proportionate to each other. A cone that’s too short or a brim that’s too wide can throw off the balance of the hat.
- Overcomplicating Details: While details are important, too many can make your drawing look cluttered. Stick to a few key elements to keep it clean and simple.
- Ignoring Shading: Shading adds depth and dimension to your drawing, so don’t skip this step. Even a few subtle shadows can make a big difference.
By avoiding these common mistakes, you’ll be well on your way to creating a stunning witch hat drawing.
How to Customize Your Witch Hat Drawing
Once you’ve mastered the basics, it’s time to put your own spin on your witch hat drawing. Here are a few ideas to get you started:
- Change the Color: While black is the classic choice, why not try purple, green, or even gold for a more vibrant look?
- Add Patterns: Incorporate patterns like stripes, polka dots, or stars to make your witch hat truly unique.
- Incorporate Accessories: Add a feather, broomstick, or even a little cat to your drawing for an extra touch of whimsy.
The sky’s the limit when it comes to customizing your witch hat. Let your imagination run wild and see where it takes you!
Advanced Techniques for Drawing Witch Hats
If you’re ready to take your witch hat drawings to the next level, here are a few advanced techniques to try:
- Perspective Drawing: Experiment with drawing witch hats from different angles, such as side views or three-quarter views. This will help you develop your spatial awareness and create more dynamic drawings.
- Texturing: Use cross-hatching, stippling, or other texturing techniques to add depth and interest to your witch hat.
- Layering Colors: Build up layers of color to create a more realistic and vibrant witch hat. This works especially well if you’re using colored pencils or watercolors.
These techniques may take some practice, but the results will be worth it. Keep pushing yourself to try new things and explore different artistic styles.
Resources for Further Learning
If you’re eager to learn more about drawing witch hats and other magical creations, here are a few resources to check out:
- Online Tutorials: Websites like YouTube and Skillshare offer a wealth of free tutorials on drawing witch hats and other fantasy art.
- Art Books: Look for books on fantasy art and character design for more in-depth guidance and inspiration.
- Art Communities: Join online forums and social media groups dedicated to art and drawing. These communities can provide feedback, support, and encouragement as you develop your skills.
Remember, the best way to improve is to keep learning and practicing. So don’t be afraid to explore new resources and techniques!
Conclusion: Your Magical Drawing Journey Awaits
And there you have it, folks—a comprehensive guide on how to draw a witch hat. From understanding the basic structure to mastering advanced techniques, you now have all the tools you need to create stunning witch hat drawings. Whether you’re a beginner or an experienced artist, remember that practice and creativity are the keys to success.
So, what are you waiting for? Grab your supplies and start drawing! And don’t forget to share your creations with the world. Whether it’s through social media, art galleries, or just showing your friends and family, sharing your work can be incredibly rewarding.
Thanks for joining me on this magical journey, and I hope you’ve found this guide helpful. If you have any questions or feedback, feel free to leave a comment below. Happy drawing, and may your witch hats always be pointy and perfect!
Table of Contents
- Why Learning How to Draw a Witch Hat is Worth Your Time
- The Basics: Understanding the Witch Hat Structure
- What You’ll Need to Draw a Witch Hat
- Step-by-Step Guide: How to Draw a Witch Hat
- Tips and Tricks for Drawing a Perfect Witch Hat
- Common Mistakes to Avoid When Drawing a Witch Hat
- How to Customize Your Witch Hat Drawing
- Advanced Techniques for Drawing Witch Hats
- Resources for Further Learning
- Conclusion: Your Magical Drawing Journey Awaits
How To Get Paint Off Wallpaper Without Ruining Your Walls
Almeda Tyler: The Creator Who Revolutionized Digital Art
How To Use Panoxyl Foaming Wash: A Beginner's Guide For Clearer Skin

How to draw an easy Witches hat Easy halloween drawings, Planner
How To Draw A Witch Hat Easy Drawing Tutorial For Kids, 52 OFF
How To Draw A Witch Hat Easy Drawing Tutorial For Kids, 52 OFF
