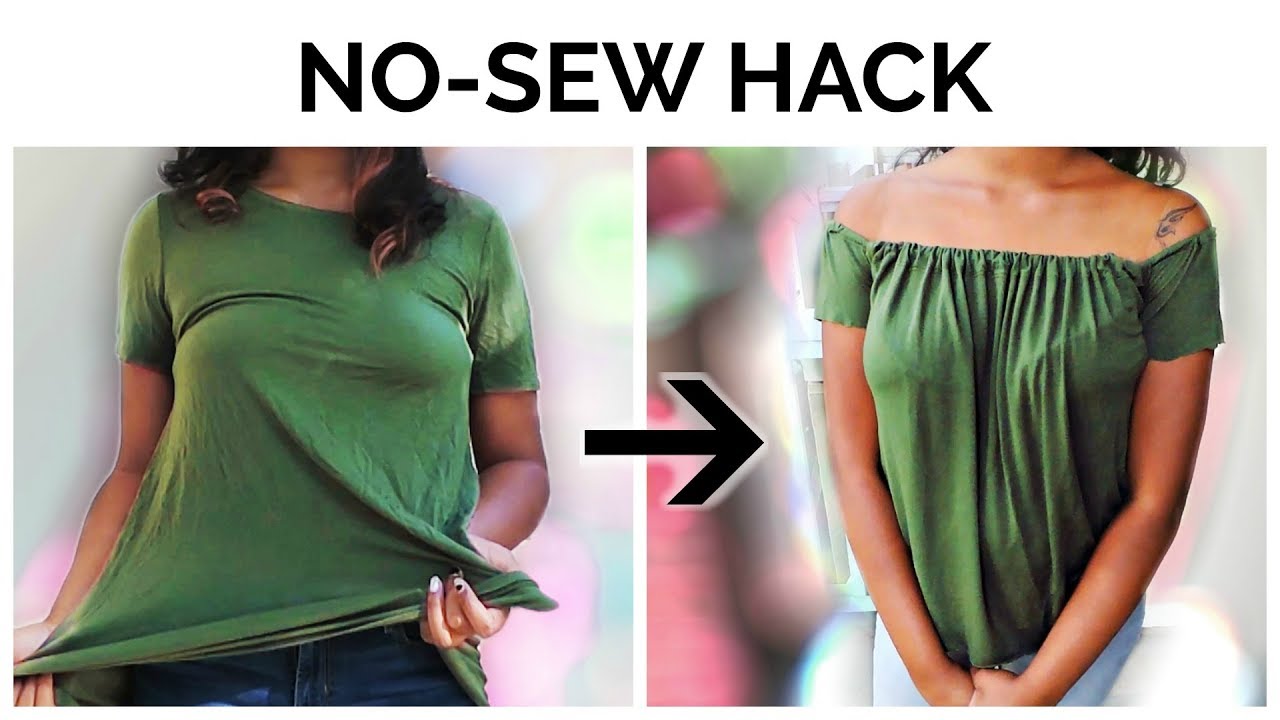
How To Master Cutting A Shirt To Be Off The Shoulder: A Step-by-Step Guide
Listen up, fashion enthusiasts! If you’ve ever wondered how to transform a regular shirt into an off-the-shoulder masterpiece, you’re in the right place. Cutting a shirt to be off the shoulder is more than just a DIY project—it’s a skill that can elevate your wardrobe game. Whether you're doing this for fun or to save some bucks, this guide will show you how to rock that trend without breaking the bank.
Let’s face it, off-the-shoulder tops are everywhere these days. Celebrities flaunt them on the red carpet, influencers post them on social media, and even your best friend might have one in her closet. But what if you could create your own version without spending a fortune? That’s where this article comes in. We’ll break it down step by step so you can DIY your way to fashion success.
Now, before we dive into the nitty-gritty, let me tell you something: this isn’t just about scissors and fabric. It’s about confidence, creativity, and making a statement. By the end of this guide, you’ll not only know how to cut a shirt to be off the shoulder but also understand why this trend is worth the effort. So, grab your tools, and let’s get started!
Read also:Big Desi Butt The Ultimate Guide To Celebrating Curves
Why Cutting a Shirt to Be Off the Shoulder is a Game-Changer
First things first, why should you even bother with cutting a shirt to be off the shoulder? Well, it’s all about versatility and personalization. Imagine turning that old T-shirt or blouse into something fresh and trendy. Not only does it save you money, but it also adds a unique touch to your wardrobe. Plus, who doesn’t love a good DIY project that ends with a killer outfit?
Here’s the thing: off-the-shoulder styles are timeless. They flatter almost every body type, add a touch of elegance, and are perfect for any occasion. Whether you’re heading to a casual brunch or dressing up for a night out, this look has got you covered. And the best part? You’re in control of the design. Want it slouchy? Go for it. Prefer something more fitted? You can do that too.
Benefits of DIY Off-the-Shoulder Shirts
- Saves money: Why buy new when you can repurpose what you already have?
- Customizable: Tailor the fit and style to match your personality.
- Environmentally friendly: Upcycling old clothes reduces waste and promotes sustainability.
- Boosts creativity: DIY projects are a great way to express yourself and experiment with fashion.
Tools You’ll Need for Cutting a Shirt to Be Off the Shoulder
Before you start hacking away at your favorite shirt, make sure you have the right tools. Trust me, you don’t want to end up with a lopsided masterpiece because you used the wrong scissors. Here’s a quick list of what you’ll need:
- A shirt: Preferably one you don’t mind altering. Cotton or lightweight fabrics work best.
- Scissors: Sharp and precise—no dull kitchen scissors here.
- A measuring tape: To ensure symmetry and the right fit.
- A fabric marker or chalk: For marking your cuts.
- Elastic or ribbon: Optional, but useful for adding structure.
- A sewing kit: In case you need to secure any edges.
Pro tip: Always test your tools on a scrap piece of fabric first. This will help you avoid any accidental mistakes and ensure a clean cut.
Step-by-Step Guide to Cutting a Shirt to Be Off the Shoulder
Alright, let’s get down to business. Follow these steps carefully, and you’ll have your off-the-shoulder masterpiece in no time.
Step 1: Choose the Right Shirt
Pick a shirt that fits well and is made from a fabric you’re comfortable working with. If you’re new to sewing or DIY projects, start with something simple like a cotton T-shirt. Once you’ve got the hang of it, you can move on to more challenging materials.
Read also:Cottage Cheese Air Fryer Bagels A Gamechanger For Your Breakfast Routine
Step 2: Measure and Mark
Decide how deep you want the off-the-shoulder cut to be. Use a measuring tape to mark the same distance on both sides of the shirt. Remember, symmetry is key! Use a fabric marker or chalk to draw a line where you’ll make your cuts.
Step 3: Cut with Care
Using your sharp scissors, carefully cut along the marked line. Take your time to ensure a clean, straight cut. If you’re worried about fraying, consider using pinking shears or finishing the edges with a sewing machine.
Step 4: Add Elastic (Optional)
If you want your off-the-shoulder top to stay in place, consider adding elastic. Measure the circumference of your upper arm and cut a piece of elastic to size. Sew it onto the edges of the cut to create a snug fit.
Step 5: Finish the Edges
Use a sewing machine or fabric glue to secure any raw edges. This will prevent fraying and give your shirt a polished look. Don’t forget to try it on and make any necessary adjustments.
Common Mistakes to Avoid When Cutting a Shirt to Be Off the Shoulder
Even the best DIYers make mistakes sometimes. Here are a few common pitfalls to watch out for:
- Not measuring properly: This can lead to an uneven cut, so always double-check your measurements.
- Rushing the process: Take your time to ensure a clean, precise cut. Rushing can result in mistakes that are hard to fix.
- Using the wrong tools: Dull scissors or improper markers can ruin your project. Invest in quality tools for better results.
Remember, practice makes perfect. If you mess up the first time, don’t worry! You can always try again with a new shirt.
Tips for Styling Your DIY Off-the-Shoulder Shirt
Now that you’ve created your masterpiece, it’s time to show it off. Here are a few styling tips to help you rock your new top:
- Pair it with high-waisted jeans for a casual yet chic look.
- Add a statement necklace to draw attention to your neckline.
- Throw on a blazer for a more polished, office-friendly style.
- Complete the look with strappy heels or ankle boots for a night out.
Pro tip: Experiment with layering. Try wearing a camisole or tank top underneath for added comfort and versatility.
How to Choose the Right Fabric for Cutting a Shirt to Be Off the Shoulder
Not all fabrics are created equal when it comes to DIY projects. Here’s a quick guide to help you choose the right material:
- Cotton: Easy to work with and forgiving for beginners.
- Knit: Stretchy and comfortable, perfect for off-the-shoulder styles.
- Chiffon: Adds a delicate, elegant touch but requires more skill to handle.
Always consider the fabric’s stretch and drape when planning your cuts. This will ensure your shirt fits and flatters your body.
Expert Advice on Cutting a Shirt to Be Off the Shoulder
According to fashion experts, the key to a successful DIY project is preparation and precision. “Take your time to plan out the design before you start cutting,” advises Sarah Johnson, a professional seamstress. “And don’t be afraid to experiment with different styles and fabrics.”
For those who are new to sewing, Sarah suggests starting with simple projects and gradually working your way up to more complex designs. “Practice on scraps of fabric first to get a feel for the tools and techniques,” she adds.
Is Cutting a Shirt to Be Off the Shoulder Worth It?
Absolutely! Not only does it save you money, but it also allows you to express your creativity and personal style. Plus, who doesn’t love the satisfaction of creating something with their own hands? Whether you’re a seasoned DIYer or a fashion newbie, cutting a shirt to be off the shoulder is a skill worth mastering.
Final Thoughts and Call to Action
There you have it, folks! Cutting a shirt to be off the shoulder is easier than you think. With the right tools, a bit of patience, and a dash of creativity, you can transform any shirt into a stunning off-the-shoulder masterpiece. So, what are you waiting for? Grab your scissors and get to work!
Don’t forget to share your creations with us in the comments below. We’d love to see your DIY projects and hear about your experience. And if you found this article helpful, be sure to check out our other fashion guides for more inspiration and tips.
Table of Contents
- How to Master Cutting a Shirt to Be Off the Shoulder: A Step-by-Step Guide
- Why Cutting a Shirt to Be Off the Shoulder is a Game-Changer
- Benefits of DIY Off-the-Shoulder Shirts
- Tools You’ll Need for Cutting a Shirt to Be Off the Shoulder
- Step-by-Step Guide to Cutting a Shirt to Be Off the Shoulder
- Step 1: Choose the Right Shirt
- Step 2: Measure and Mark
- Step 3: Cut with Care
- Step 4: Add Elastic (Optional)
- Step 5: Finish the Edges
- Common Mistakes to Avoid When Cutting a Shirt to Be Off the Shoulder
- Tips for Styling Your DIY Off-the-Shoulder Shirt
- How to Choose the Right Fabric for Cutting a Shirt to Be Off the Shoulder
- Expert Advice on Cutting a Shirt to Be Off the Shoulder
- Is Cutting a Shirt to Be Off the Shoulder Worth It?
- Final Thoughts and Call to Action
Corpse Bride Emily X Victoria: A Tale Of Love Beyond The Grave
Brown Packaged Snacks: The Healthy Treat That's Taking Over
Display Sand Dollars: The Ultimate Guide To Showcasing Nature's Treasures

Turn a ButtonDown Shirt Into an OfftheShoulder Top StyleCaster
Off The Shoulder Shirt Hack

Diy Shirt Cutting Off The Shoulder / WobiSobi No Sew, One Shoulder
