How To Do A Sew-In With A Closure: The Ultimate Guide For Flawless Hair
Are you ready to take your hair game to the next level? Sew-ins have been around forever, but adding a closure takes things up a notch. Whether you're a seasoned pro or just starting out, this guide will walk you through everything you need to know about how to do a sew-in with a closure like a boss.
Let's be real, sis—nothing screams confidence like a fresh sew-in with a closure that looks so natural, people will think it's your real hair. But here's the deal: doing it right takes skill, patience, and a little insider knowledge. Lucky for you, we've got all the tips and tricks you need to rock that style without breaking a sweat.
In this article, we'll break down the steps, tools, and techniques to help you achieve that flawless look. From prep work to maintenance, we’ve got your back. So grab your comb, sit tight, and let’s dive in!
Read also:Dance Young Thug The Phenomenon Thatrsquos Taking The World By Storm
Table of Contents
- What is a Sew-In?
- Why Use a Closure?
- Tools You Need for a Sew-In with Closure
- Prep Work: Getting Ready for the Sew-In
- Step-by-Step Guide to Sew-In with Closure
- Maintenance Tips for Long-Lasting Sew-Ins
- Common Mistakes to Avoid
- FAQs About Sew-Ins with Closures
- How to Choose the Right Closure
- Final Thoughts: Rock That Sew-In with Confidence
What is a Sew-In?
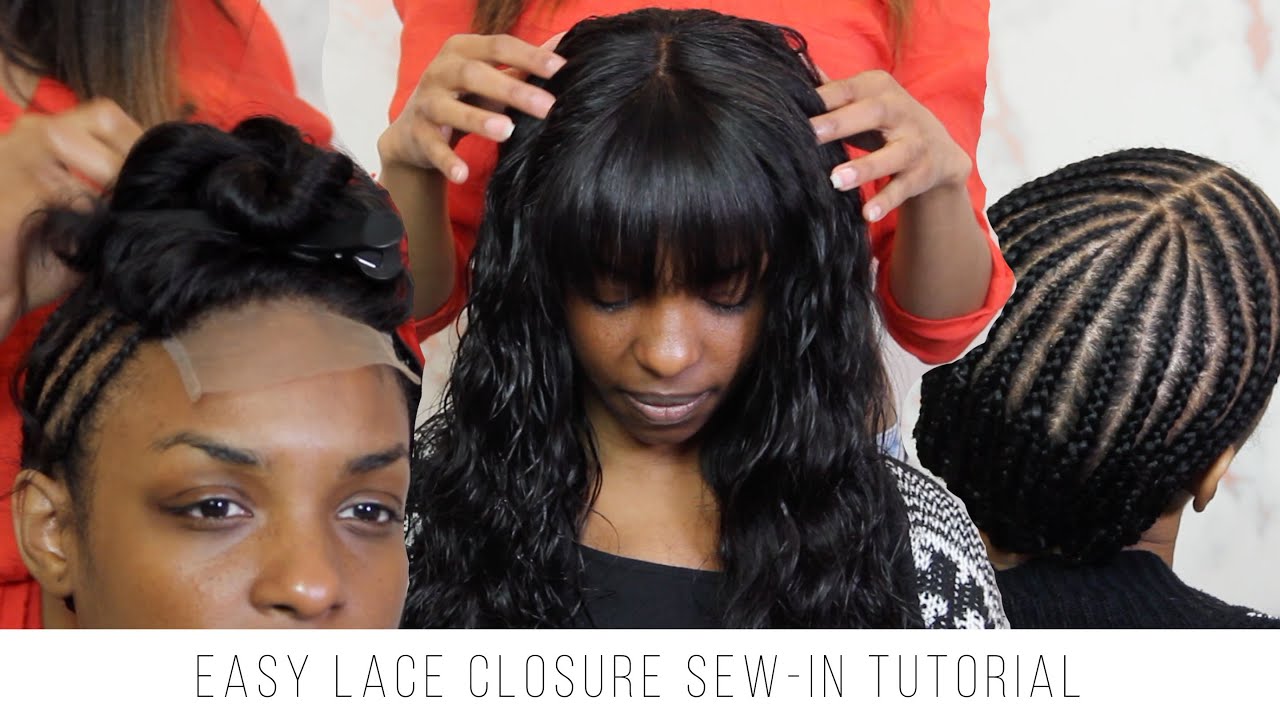
A sew-in is basically a protective hairstyle where synthetic or human hair is sewn onto your natural hair that’s been braided down. It’s a game-changer for ladies who want length, volume, or just a break from daily styling. But what makes a sew-in with a closure so special? Let me tell ya—it’s all about that seamless finish.
When you add a closure, you’re essentially creating a realistic part that looks like your natural scalp. This not only enhances the overall look but also allows you to show off your edges while keeping everything secure.
Benefits of a Sew-In with Closure
- Protects your natural hair from heat and manipulation.
- Offers versatility in styles and lengths.
- Looks super natural with the right closure.
- Keeps your edges intact while promoting hair growth.
Why Use a Closure?
Closures are like the cherry on top of your sew-in sundae. They create a natural-looking part that blends seamlessly with your weave. Plus, they allow you to switch up your part whenever you feel like it. No more being stuck with the same middle part for weeks!
Another perk? Closures protect your edges by reducing tension on the front part of your hairline. This means healthier hair and less damage over time. Now who wouldn’t want that?
Types of Closures
- 3x3 Closure: Perfect for small parts and subtle looks.
- 4x4 Closure: Ideal for fuller parts and more coverage.
- Lace Frontal Closure: Offers maximum customization and a flawless edge game.
Tools You Need for a Sew-In with Closure
Before you dive into the sew-in process, make sure you have all the necessary tools. Trust me, you don’t wanna be running around halfway through looking for a needle and thread. Here’s a quick list:
- Human or synthetic hair bundles
- Closure of your choice
- Hairnet
- Wide-tooth comb
- Box braiding needle
- Thread (matching your weave color)
- Leave-in conditioner
- Hair gel or edge control
- Scissors
And don’t forget to prep your workspace! A clean, organized area will make the whole process smoother and less stressful.
Read also:Why Is My Helix Piercing Swollen After A Year The Truth You Need To Know
Prep Work: Getting Ready for the Sew-In
Prep work is key to a successful sew-in. Skipping this step can lead to discomfort, breakage, or even an uneven style. So let’s break it down:
Start by washing and conditioning your natural hair. This ensures it’s clean and moisturized before braiding. Once dry, part your hair into sections and braid it tightly. The tighter the braids, the smoother the lay of your sew-in.
Pro tip: Apply a leave-in conditioner to your braids to keep them hydrated during the install. And don’t forget to trim any flyaways for a clean finish.
How Tight Should the Braids Be?
Now, here’s the million-dollar question: how tight should the braids be? You want them tight enough to create a smooth base but not so tight that it hurts. Think of it as a happy medium—secure but comfortable. If it’s painful, loosen it up a bit. Your scalp will thank you later!
Step-by-Step Guide to Sew-In with Closure
Alright, sis, here’s where the magic happens. Follow these steps for a flawless sew-in with a closure:
Step 1: Secure Your Base
Once your braids are done, secure them with a hairnet. This prevents any stray hairs from messing up your weave. Then, part your hair where the closure will go and pin it out of the way.
Step 2: Sew in the Weave
Using your box braiding needle and thread, start sewing the weave onto your braids. Work row by row, making sure each stitch is tight and secure. Leave space for the closure at the front.
Step 3: Attach the Closure
Now comes the fun part—attaching the closure! Place it over the braids where your part will be and secure it with tiny stitches. Be careful not to pull too tight, or it might distort the shape.
Step 4: Finish and Style
Once everything’s sewn in, trim any excess hair and style it however you like. Use edge control to slick down your baby hairs and voila! You’re ready to slay.
Maintenance Tips for Long-Lasting Sew-Ins
Now that your sew-in is done, it’s time to take care of it. Proper maintenance ensures it lasts longer and keeps your natural hair healthy. Here’s what you need to do:
- Wash your hair every 1-2 weeks using a gentle shampoo.
- Moisturize your braids regularly to prevent dryness.
- Sleep on a silk pillowcase to reduce friction and breakage.
- Re-tighten loose braids as needed.
Remember, consistency is key. Neglecting your sew-in can lead to damage, so stay on top of it!
Common Mistakes to Avoid
Even the best of us make mistakes sometimes. Here are a few common ones to watch out for:
- Not Braiding Tightly Enough: Loose braids can cause bumps and an uneven lay.
- Using the Wrong Thread: Make sure your thread matches your weave color to avoid visible stitching.
- Skipping Prep Work: Rushing through prep can lead to discomfort and a messy finish.
- Over-Tightening the Closure: Pulling too tight can damage your edges and cause breakage.
By avoiding these pitfalls, you’ll ensure a smoother and more successful sew-in experience.
FAQs About Sew-Ins with Closures
Got questions? We’ve got answers. Here are some FAQs about sew-ins with closures:
How Long Does a Sew-In with Closure Last?
A well-maintained sew-in can last anywhere from 6 to 8 weeks. Of course, this depends on how well you take care of it.
Can I Sleep with My Sew-In?
Absolutely! Just make sure to protect it with a silk bonnet or pillowcase to prevent tangles and breakage.
Do Closures Damage My Hair?
Not if done correctly. Using the right techniques and avoiding excessive tension can prevent damage to your edges.
How to Choose the Right Closure
Choosing the right closure is crucial for achieving that natural look. Consider factors like:
- Size: 3x3 for smaller parts, 4x4 for fuller coverage.
- Color: Match it to your scalp for a seamless finish.
- Material: Lace closures are the most popular due to their natural appearance.
Remember, the closure should complement your style and enhance your overall look.
Final Thoughts: Rock That Sew-In with Confidence
There you have it—everything you need to know about how to do a sew-in with a closure. From prep work to maintenance, we’ve covered all the bases to help you achieve that flawless style.
So go ahead, grab your tools, and get to work. And don’t forget to share your results with us in the comments below. We’d love to see your masterpiece!
Until next time, keep slaying, sis!
How To Display The Caller's Name: A Comprehensive Guide To Personalizing Your Call Experience
Check Charger Connection: The Ultimate Guide To Preventing Battery Blues
Brussel Sprouts Toaster Oven: The Ultimate Guide To Crispy Perfection

How To Do A Closure Sew In 1 In A Simple And Successful Way
Sew Ins With Closure Near Me

Lace Closure Sew In Everything You Should Know
