How To Take Tub Stopper Out: A Comprehensive Guide For Every DIY Enthusiast
Have you ever found yourself staring at a stubborn tub stopper, wondering how to take it out without causing a disaster? Well, you’re not alone! Whether you’re trying to clean your bathtub drain, replace the stopper, or just troubleshoot an issue, knowing how to remove a tub stopper is a skill that can save you time and money. In this guide, we’ll walk you through everything you need to know about taking out that pesky stopper like a pro.
Let’s face it—bathtub stoppers can be tricky little buggers. Sometimes they’re stuck, sometimes they’re covered in gunk, and sometimes you just don’t know where to start. But don’t sweat it! This guide is here to break it all down step by step so you can tackle this project with confidence. Plus, we’ll cover some common mistakes to avoid along the way.
Before we dive in, let’s quickly highlight why learning how to take a tub stopper out is such a big deal. Whether you’re dealing with a clogged drain, wanting to upgrade your plumbing fixtures, or simply giving your tub a deep clean, removing the stopper is often the first step. So, grab your tools, roll up your sleeves, and let’s get started!
Read also:Why Your Gpu Fans Stop Spinning A Deep Dive Into The Problem
Why Is It Important to Know How to Take Tub Stopper Out?
Understanding the importance of removing a tub stopper goes beyond just fixing a plumbing issue. It’s about empowering yourself to handle small home repairs without calling in the big guns (a.k.a. professional plumbers). Not only does this save you cash, but it also gives you a sense of accomplishment that’s hard to beat.
Think about it—when water starts backing up in your tub or when you notice weird noises coming from the drain, the problem often lies with the stopper. By knowing how to remove it, you can inspect for debris, mineral buildup, or even broken parts that might be causing the issue. Plus, regular maintenance of your tub stopper can extend the life of your plumbing system and keep things running smoothly.
And hey, if you’re into DIY projects, this is one skill that will definitely come in handy. So, whether you’re a seasoned handyman or a complete newbie, this guide will walk you through the process in a way that’s easy to follow and super practical.
Common Reasons for Removing a Tub Stopper
Now that we’ve established why removing a tub stopper is important, let’s talk about the most common reasons people find themselves needing to do it:
- Clogged Drains: Hair, soap scum, and other gunk can accumulate in your drain over time, causing water to back up. Removing the stopper allows you to clean out the debris and restore proper drainage.
- Leaky or Damaged Stoppers: If your tub stopper is leaking or damaged, it’s probably time for a replacement. Removing the old one is the first step toward installing a new one.
- Deep Cleaning: Regular cleaning of your tub stopper can prevent clogs and unpleasant odors. Removing it gives you access to areas that are otherwise hard to reach.
- Upgrading Fixtures: If you’re renovating your bathroom or just want to update the look of your tub, removing the old stopper is necessary before installing a new one.
These are just a few examples, but the bottom line is this: knowing how to remove a tub stopper opens the door to a whole range of possibilities when it comes to maintaining and improving your bathroom.
Tools You’ll Need to Take Tub Stopper Out
Before you jump into the process, it’s crucial to gather the right tools. Having the proper equipment will make the job much easier and help you avoid frustration. Here’s a list of what you’ll need:
Read also:Hottest Haircuts For The Youth Your Ultimate Guide To Cortes De Pelo Para Joven
- Flathead Screwdriver
- Phillips Head Screwdriver
- Needle-Nose Pliers
- Plumber’s Wrench
- Gloves (optional but recommended)
- Rag or Towel
Some tub stoppers might require specialized tools, depending on the type and design. Don’t worry—we’ll cover the different types of stoppers later in this guide. For now, make sure you have these basics on hand, and you’ll be good to go.
Pro Tip: Keep It Clean
While you’re gathering your tools, consider keeping a bucket or container nearby to catch any water or debris that might come out during the process. This will help keep your bathroom tidy and make cleanup a breeze. And hey, who doesn’t love a clean workspace, right?
Understanding the Different Types of Tub Stoppers
Not all tub stoppers are created equal. There are several types of stoppers out there, each with its own unique design and removal process. Let’s take a closer look at the most common ones:
1. Pop-Up Stoppers
Pop-up stoppers are probably the most common type found in modern bathtubs. They’re operated by a lever or knob that raises and lowers the stopper. Removing a pop-up stopper typically involves unscrewing the pivot rod from underneath the tub.
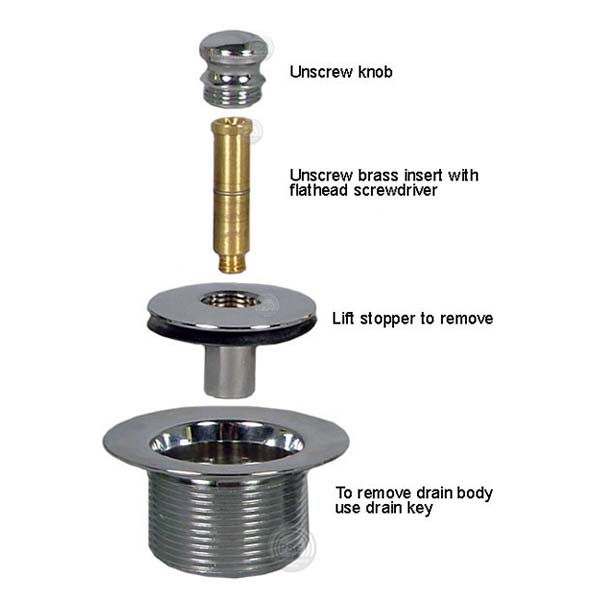
2. Toe-Touch Stoppers
Toe-touch stoppers are activated by pressing down on the top of the stopper. These are often used in older homes and can be a bit tricky to remove. You’ll usually need to unscrew the cap on top to access the internal mechanism.
3. Gravity Stoppers
Gravity stoppers rely on—you guessed it—gravity to seal the drain. They’re simple and straightforward to remove, often just requiring a twist or pull to detach them from the drain.
4. Twist-and-Drain Stoppers
Twist-and-drain stoppers are activated by twisting the top of the stopper to open or close the drain. Removing these usually involves unscrewing the top piece to access the stopper itself.
Knowing which type of stopper you have will help you determine the best approach for removing it. Don’t worry if you’re not sure yet—we’ll cover each type in more detail later in this guide.
Step-by-Step Guide: How to Take Tub Stopper Out
Now that you’re familiar with the tools and types of stoppers, let’s dive into the step-by-step process of removing a tub stopper. Follow these instructions carefully, and you’ll have that stopper out in no time.
Step 1: Turn Off the Water Supply
Before you start tinkering with your tub stopper, it’s a good idea to turn off the water supply to prevent any accidental flooding. You’ll usually find the shut-off valve under the sink or near the tub. Just give it a quarter turn, and you’re good to go.
Step 2: Identify the Type of Stopper
Take a close look at your tub stopper and identify which type you’re dealing with. This will determine the specific steps you need to follow. Refer back to the section on types of stoppers if you’re not sure.
Step 3: Gather Your Tools
Make sure you have all the necessary tools within reach. Having everything ready will save you time and hassle during the process.
Step 4: Remove the Stopper
The actual removal process will vary depending on the type of stopper. Here’s a quick breakdown:
- Pop-Up Stoppers: Unscrew the pivot rod from underneath the tub using a wrench. Once it’s loose, gently pull the stopper out.
- Toe-Touch Stoppers: Unscrew the cap on top of the stopper using a flathead screwdriver. Then, carefully pull the stopper out of the drain.
- Gravity Stoppers: Simply twist or pull the stopper out of the drain. It should come out easily without much resistance.
- Twist-and-Drain Stoppers: Unscrew the top piece of the stopper using your fingers or a pair of pliers. Once it’s loose, pull the stopper out of the drain.
Step 5: Clean the Drain and Stopper
Once the stopper is out, take a moment to clean it thoroughly. Remove any debris, hair, or mineral buildup that might be clogging the drain. Use a rag or towel to wipe everything down, and make sure the stopper is in good condition before reinstalling it.
Step 6: Reinstall the Stopper (Optional)
If you’re not replacing the stopper, simply reinsert it into the drain and secure it in place. Make sure everything is tightly fastened to prevent leaks or further issues.
Troubleshooting Common Issues
Even with the best instructions, things can sometimes go wrong. Here are some common issues you might encounter when trying to remove a tub stopper and how to fix them:
1. Stuck Stoppers
If your stopper is stuck, try applying some penetrating oil (like WD-40) around the edges to loosen it up. Let it sit for a few minutes before attempting to remove it again. If that doesn’t work, you might need to use a pair of pliers to gently wiggle it loose.
2. Broken Mechanisms
If the internal mechanism of your stopper is broken, you might need to replace it entirely. This usually involves purchasing a new stopper kit and following the manufacturer’s instructions for installation.
3. Leaky Drains
If your drain is leaking after removing the stopper, check the gasket or rubber seal around the drain. It might be worn out or damaged, requiring replacement.
By addressing these issues head-on, you’ll ensure a smoother removal process and avoid any potential headaches down the road.
DIY Tips and Tricks
Here are a few extra tips to make your tub stopper removal experience as painless as possible:
- Work in a Well-Lit Area: Good lighting will help you see what you’re doing and prevent mistakes.
- Take Photos: If you’re unsure about the process, take photos of the stopper and its components before removing them. This will serve as a reference when reinstalling or troubleshooting.
- Be Patient: Plumbing can be tricky, so don’t rush the process. Take your time, and you’ll get it right.
These little tips can make a big difference in your overall success rate. Plus, they’ll help you avoid unnecessary stress and frustration.
Conclusion: You Got This!
There you have it—a comprehensive guide on how to take a tub stopper out like a true DIY pro. By following the steps outlined in this article, you’ll be able to tackle this project with confidence and ease. Remember, the key is to stay calm, work carefully, and don’t hesitate to seek help if you’re stuck.
Now that you’ve learned how to remove a tub stopper, why not share your newfound knowledge with others? Leave a comment below and let us know how your experience went. And if you’re looking for more DIY tips and tricks, be sure to check out our other articles. Happy plumbing!
Table of Contents
- Why Is It Important to Know How to Take Tub Stopper Out?
- Common Reasons for Removing a Tub Stopper
- Tools You’ll Need to Take Tub Stopper Out
- Understanding the Different Types of Tub Stoppers
- Step-by-Step Guide: How to Take Tub Stopper Out
- Troubleshooting Common Issues
- DIY Tips and Tricks
- Conclusion: You Got This!
Weaknesses Of A Man In Love: Unveiling The Heart's Vulnerability
Como Se Dice En Español Yes: The Ultimate Guide To Mastering Spanish Affirmation
Clay Heart Tray: The Perfect Blend Of Art And Functionality

How to Adjust a Tub Stopper

Moen Tub Drain Stopper Removal at Francisco Pedro blog
DIY How To Remove a Bathtub Drain Stopper
