How To Plaster A Wall Like A Pro: A Step-by-Step Guide For Beginners
Alright, let me spill the tea right off the bat—plastering a wall might sound intimidating, but trust me, it’s totally doable if you’ve got the right tools and know-how. If you’re here wondering how to plaster a wall, or as the pros call it, “como empastar una pared,” you’re in the right place. This guide is all about breaking down the process so even a total noob can get it done without making a mess. So, grab your tools and let’s dive in, shall we?
Now, before we get into the nitty-gritty, let’s address the elephant in the room: plastering isn’t just slapping some goo on a wall and hoping for the best. It’s an art, my friend, and just like any art form, it requires practice, patience, and a little bit of finesse. But don’t sweat it—we’ll walk you through every step, from prepping the wall to the final smooth finish.
By the time you finish reading this, you’ll be ready to tackle that wall like a seasoned pro. And hey, who knows? You might even impress your neighbors with your newfound skills. So, buckle up, buttercup, because we’re about to level up your DIY game.
Read also:Mike Napoli Alex The Untold Story Of A Baseball Legend
What You’ll Need to Get Started
Let’s talk about the essentials. Before you even think about grabbing that trowel, you’ll need to gather a few key items. Think of this as your plastering starter pack:
- Plaster mix (get the right type for your wall material)
- A hawk or mixing board
- A trowel (the bigger, the better)
- A float for smoothing
- A bucket and water
- Safety gear (gloves, goggles, mask)
- A sponge or damp cloth
And remember, don’t skimp on quality. Cheap tools can ruin your project faster than you can say "oops." Invest in decent gear, and it’ll pay off in the long run. Trust me, I’ve been there.
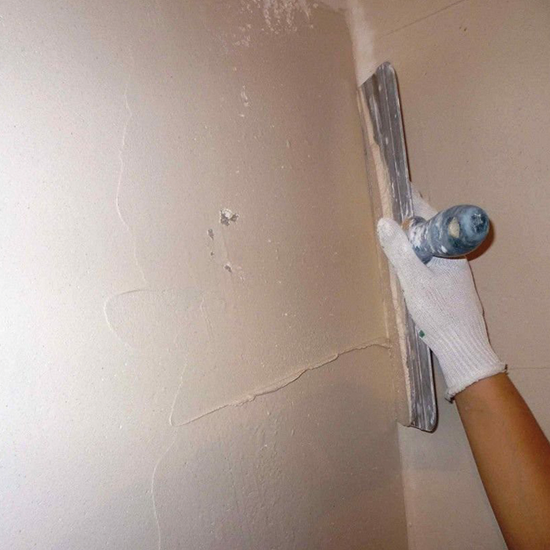
Preparing the Wall: The Foundation of Success
Now, let’s talk about the prep work. This is where the magic starts—or where things can go horribly wrong if you rush it. Prepping the wall is like laying the foundation for a house—if it’s not solid, everything else is gonna crumble.
Here’s what you need to do:
- Clean the wall thoroughly. Dust, dirt, and grease are the enemies of smooth plastering.
- Fix any cracks or holes. Use a filler to patch them up and let it dry completely.
- Moisten the wall. This helps the plaster stick better and prevents it from cracking later.
And don’t forget to mask off any areas you don’t want plastered, like door frames or windows. A little extra effort here will save you a ton of headaches later.
Pro Tip: Test Your Plaster First
Before you dive headfirst into plastering the entire wall, do a small test patch. This’ll help you figure out if the plaster’s consistency is right and give you a chance to practice your technique. Think of it like a dress rehearsal—necessary but not glamorous.
Read also:2 Braids Into A Ponytail The Ultimate Guide To Stylish Hair Transformation
Applying the First Coat: The Base Layer
Alright, now that your wall’s prepped and your tools are ready, it’s time to apply that first coat. This is the base layer, and it’s all about creating a solid foundation for the rest of the plaster.
Here’s how you do it:
- Load your hawk with plaster and spread it onto the wall using your trowel. Don’t worry about being perfect—this is just the base.
- Work in small sections to ensure even coverage. You don’t want to overload the wall and risk it all falling off.
- Let the first coat dry completely before moving on. Patience is key, my friend.
And remember, the first coat doesn’t have to be smooth. It’s all about building up that initial layer so the next one has something to cling to.
Common Mistakes to Avoid
Here’s where a lot of beginners trip up:
- Applying too much plaster at once. This can lead to cracking and unevenness.
- Not letting each layer dry properly. Rushing the process can ruin your entire project.
- Forgetting to clean your tools. Trust me, dried plaster is a nightmare to remove.
So, take your time and do it right the first time. Your future self will thank you.
Smoothing It Out: The Second Coat
Now that your first coat’s dry, it’s time to add the second layer. This is where things start to look a little more polished. The goal here is to smooth out any imperfections and create an even surface.
Here’s the drill:
- Use your float to spread the plaster over the first coat. Apply it in long, even strokes.
- Don’t press too hard—you want to maintain that smooth finish.
- Once you’ve covered the entire wall, go over it with a damp sponge to remove any excess plaster and smooth out any rough spots.
And voilà! You’re starting to see the fruits of your labor. But don’t celebrate just yet—we’ve still got one more step to go.
Why the Second Coat Matters
Think of the second coat as the icing on the cake. It’s what takes your wall from “meh” to “wow.” Without it, your wall might look lumpy or uneven, and nobody wants that. So, take the extra time to do it right. Your wall will thank you.
The Final Touch: The Third Coat
This is it—the grand finale. The third coat is all about achieving that flawless finish. It’s the layer that makes your wall look professional and polished.
Here’s how you nail it:
- Apply the plaster in thin, even layers. Less is more here—you don’t want to overwhelm the wall.
- Use your trowel to smooth it out, working in long, sweeping motions.
- Finish off with a damp sponge to remove any imperfections and give it that final shine.
And there you have it—your very own plastered wall. Take a step back and admire your handiwork. You’ve officially leveled up your DIY skills.
Tips for a Perfect Finish
Here are a few extra tips to ensure your wall looks its best:
- Work in good lighting. It’s hard to spot imperfections in dim lighting.
- Use a clean sponge. A dirty sponge can leave streaks and marks.
- Don’t rush the drying process. Let each layer dry completely before moving on.
Follow these tips, and you’ll be plastering like a pro in no time.
Common Issues and How to Fix Them
Even the best-laid plans can go awry sometimes. Here are a few common issues you might encounter and how to fix them:
- Cracking: If your plaster cracks, it’s usually due to applying too much at once or not letting it dry properly. Fix it by sanding down the area and applying a new layer.
- Bubbling: Bubbles can form if the plaster’s too wet or if there’s air trapped underneath. Pop the bubbles with a pin and smooth out the area.
- Unevenness: If your wall looks lumpy, go over it with a damp sponge and smooth it out. Patience is key here.
And remember, mistakes happen. The important thing is to learn from them and keep improving.
When to Call in the Pros
Sometimes, despite your best efforts, things just don’t go as planned. If you’re struggling or the wall looks worse than when you started, it might be time to call in a professional. There’s no shame in admitting you need help—sometimes it’s the smartest move you can make.
Final Thoughts: You Did It!
Congratulations, you’ve made it to the end! By now, you should have a solid understanding of how to plaster a wall like a pro. From prepping the wall to applying that final coat, you’ve got the skills to tackle any plastering project that comes your way.
So, what’s next? Well, why not share your newfound knowledge with your friends? Or better yet, take on another DIY project and show off your skills. The world’s your oyster, my friend.
And if you’ve got any questions or tips of your own, drop them in the comments below. We’d love to hear from you. Until next time, happy plastering!
References
For more information on plastering techniques, check out these trusted resources:
Table of Contents
- What You’ll Need to Get Started
- Preparing the Wall: The Foundation of Success
- Applying the First Coat: The Base Layer
- Smoothing It Out: The Second Coat
- The Final Touch: The Third Coat
- Common Issues and How to Fix Them
- Final Thoughts: You Did It!
- References
Hacks For Long Layered Haircuts: The Ultimate Guide To Degradé Styles
Laura Kinney Fanart: Your Ultimate Guide To The Mutant Marvel Sensation
How To Unlock All Items In The Sims 4: A Comprehensive Guide For Sims Enthusiasts
¿CÓMO EMPASTAR UNA PARED? El Oficial

¿CÓMO EMPASTAR UNA PARED? El Oficial
¿CÓMO EMPASTAR UNA PARED? El Oficial
