How To Disassemble A Sole F80 Treadmill: A Step-by-Step Guide For Fitness Enthusiasts
Alright folks, let’s get down to business. If you’re reading this, chances are you’ve got a Sole F80 treadmill that needs some serious disassembly—whether it’s for moving, repair, or just because you want to see what’s under the hood. Let me tell you, disassembling a treadmill might sound intimidating, but with the right guidance, it’s totally doable. So buckle up, grab your tools, and let’s dive into how to disassemble a Sole F80 treadmill without losing your mind—or any screws.
Now, before we jump into the nitty-gritty details, I want to emphasize something important: safety first. This isn’t just some random piece of gym equipment; it’s a machine with moving parts, electrical components, and a motor that could pack a punch if mishandled. We’ll cover all the precautions you need to take so you don’t end up with a DIY disaster.
By the end of this guide, you’ll not only know how to disassemble a Sole F80 treadmill like a pro but also understand why each step matters. Think of it as your personal cheat sheet for tackling this project with confidence. Ready? Let’s go!
Read also:Converse Tongue Slipping The Ultimate Guide To Understanding And Managing This Common Phenomenon
Why Disassemble a Sole F80 Treadmill?
Before we break out the toolkit, let’s talk about why you’d want to disassemble your Sole F80 treadmill in the first place. Is it for relocation? Maintenance? Or maybe you’re just curious about what makes this beast tick? Whatever the reason, understanding the "why" can help you approach the task with purpose.
Here’s the deal: the Sole F80 is one of the best treadmills on the market, but its size and weight can make it a real pain when it comes to moving or servicing. Disassembling it allows you to break it down into manageable pieces, making transportation easier and repairs more accessible.
Plus, knowing how to disassemble it gives you a deeper appreciation for its design and functionality. It’s like taking apart a watch to see how the gears work—it’s educational and empowering. So whether you’re a fitness enthusiast or a DIY warrior, this skill is worth mastering.
Tools You’ll Need to Disassemble a Sole F80 Treadmill
Let’s face it, no job gets done without the right tools. For disassembling a Sole F80 treadmill, you’ll need a few essentials. Don’t worry, nothing too fancy—just the basics to get the job done right. Here’s a quick list:
- Socket wrench set (including a 13mm socket)
- Phillips head screwdriver
- Flathead screwdriver
- Allen wrenches (if your treadmill has any Allen bolts)
- Pliers (optional, but handy for gripping tight spots)
- A soft cloth or towel (to protect surfaces)
- A container to keep screws and small parts organized
Pro tip: Label everything as you go. Trust me, you’ll thank yourself later when it’s time to reassemble the treadmill.
Safety First: Precautions Before Disassembling
Listen up, because this is crucial. Safety should always be your top priority when working with any kind of machinery. Here’s what you need to do before you even touch that treadmill:
Read also:Why Cooking Chips In Lard Is A Gamechanger For Foodies
- Unplug the treadmill from the power source. No electricity means no surprises.
- Move the treadmill to a flat, stable surface. This will prevent it from tipping over during disassembly.
- Clear the area of clutter. You don’t want to trip over anything while you’re working.
- Wear protective gloves and eyewear. Better safe than sorry, right?
Remember, a little caution now can save you a lot of headaches later. Now that we’ve got the safety checklist out of the way, let’s move on to the fun part.
Step-by-Step Guide to Disassemble a Sole F80 Treadmill
Alright, here’s where the magic happens. Follow these steps carefully, and you’ll have your Sole F80 treadmill disassembled in no time.
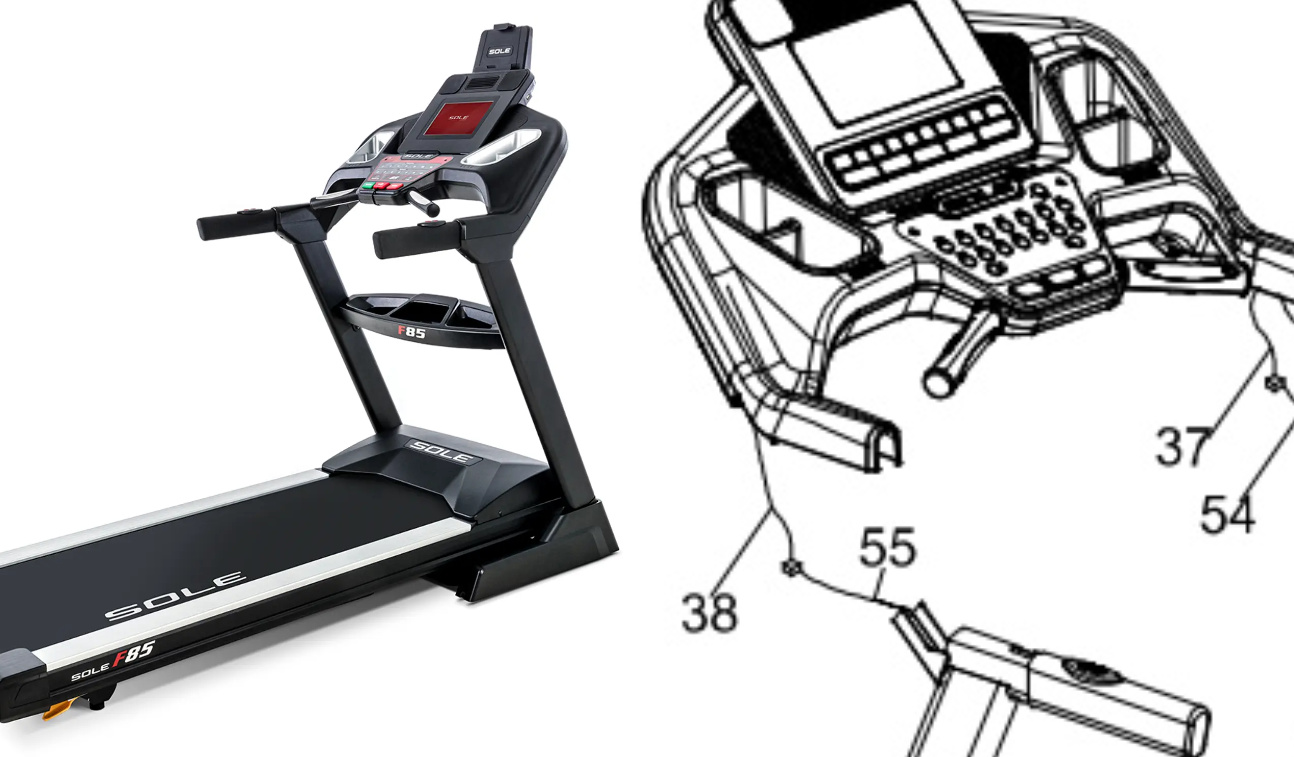
Step 1: Remove the Console
The console is the brain of your treadmill, and it’s usually the easiest part to remove. Start by unscrewing the mounting brackets that hold the console in place. Gently lift it off and set it aside. Be careful not to damage the wiring—if it’s detachable, unplug it first.
Step 2: Detach the Handrails
Next up, the handrails. These are usually held in place by bolts or screws. Use your socket wrench or screwdriver to loosen them, then carefully pull the handrails away from the frame. Again, label and store the screws in a safe place.
Step 3: Take Off the Side Panels
The side panels are there for aesthetics and protection, but they need to come off for full access. Unscrew the panels and gently pry them away from the frame. You might need to wiggle them a bit to get them loose.
Step 4: Remove the Belt and Deck
This is where things get a little tricky. The running belt and deck are the heart of the treadmill, so take your time here. Start by loosening the tension bolts on either side of the treadmill. Once the belt is loose, carefully roll it off the deck. Then, unscrew the deck and lift it out.
Step 5: Disconnect the Motor
The motor is the powerhouse of your treadmill, and it’s usually located at the front. Unplug the motor from the wiring harness and unscrew it from the frame. Be careful with the wiring—don’t yank it out forcefully.
Step 6: Dismantle the Frame
Finally, it’s time to break down the frame. This involves removing the front and rear rollers, as well as any additional supports. Use your tools to loosen the bolts and carefully dismantle the frame piece by piece.
Troubleshooting Common Issues During Disassembly
Even the best-laid plans can hit a snag. If you encounter any issues during the disassembly process, here are a few tips to help you troubleshoot:
- Stuck Screws: If a screw won’t budge, try using a rubber mallet to tap the tool lightly. This can help break the corrosion loose.
- Loose Wiring: If you notice any loose or frayed wires, make a note of them. You’ll want to address these during reassembly.
- Heavy Components: Don’t try to lift heavy parts alone. Enlist a friend or use a lifting strap to avoid injury.
Remember, patience is key. If something doesn’t seem right, stop and reassess before proceeding.
How to Store Disassembled Parts Safely
Once your Sole F80 treadmill is disassembled, you’ll need to store the parts properly to prevent damage. Here’s how:
- Wrap delicate components like the console and wiring in bubble wrap or cloth.
- Label all screws and bolts with their corresponding locations for easy reassembly.
- Use a sturdy box or container to store smaller parts.
- Keep the frame and larger components in a dry, secure location.
By taking these precautions, you’ll ensure that all your hard work doesn’t go to waste when it’s time to put everything back together.
Reassembly Tips for Your Sole F80 Treadmill
Disassembly is only half the battle. When it’s time to reassemble your treadmill, here are a few tips to keep in mind:
- Follow the reverse order of disassembly. Start with the frame, then work your way up to the console.
- Double-check all connections and bolts to ensure they’re secure.
- Test the treadmill thoroughly before using it again.
Reassembly can be just as rewarding as disassembly, so take your time and enjoy the process.
Conclusion: Mastering the Art of Disassembly
And there you have it, folks—a comprehensive guide on how to disassemble a Sole F80 treadmill. Whether you’re moving, repairing, or just curious, this skill can come in handy more often than you think. By following these steps and staying safe, you’ll be able to tackle the job with confidence.
Now it’s your turn to take action. Share this guide with a friend who might find it useful, leave a comment with your own tips and tricks, or check out our other articles for more fitness-related content. Remember, knowledge is power—and now you’ve got the power to conquer your Sole F80 treadmill like a pro.
Table of Contents
- Why Disassemble a Sole F80 Treadmill?
- Tools You’ll Need to Disassemble a Sole F80 Treadmill
- Safety First: Precautions Before Disassembling
- Step-by-Step Guide to Disassemble a Sole F80 Treadmill
- Troubleshooting Common Issues During Disassembly
- How to Store Disassembled Parts Safely
- Reassembly Tips for Your Sole F80 Treadmill
Thanks for sticking around, and happy disassembling!
How To Fix A Snagged Shirt: A Comprehensive Guide For Every Closet Crisis
When Is Julie And The Phantoms 2 Coming Out? Everything You Need To Know
How To Boil Chicken Perfectly For Shredding – A Simple Guide

Disassemble Sole F85 Treadmill StepbyStep Guide T7FIT
How to Disassemble a Sole F85 Treadmill for Moving

How to Disassemble the Sole f65 Treadmill for Moving
