How To Draw An Easy Mountain: Step-by-Step Guide For Beginners
Let’s face it, drawing mountains might sound intimidating, but it doesn’t have to be complicated. Whether you’re a beginner or just looking to refresh your skills, learning how to draw an easy mountain can be a fun and rewarding experience. In this guide, we’ll break down the process into simple steps that anyone can follow. So grab your pencil and let’s get started!
Drawing isn’t just about creating something visually appealing; it’s also about expressing yourself. Mountains, in particular, are iconic symbols of nature’s beauty and grandeur. By mastering how to draw an easy mountain, you’ll not only enhance your artistic skills but also gain confidence in tackling more complex subjects later on.
This guide isn’t just about teaching you the mechanics of drawing. It’s about inspiring you to see the world through a creative lens. Who knows? Maybe after finishing this tutorial, you’ll feel inspired to draw entire landscapes or even create your own masterpiece!
Read also:Costco Tortilla Press The Ultimate Kitchen Companion For Taco Lovers
Why Learn How to Draw an Easy Mountain?
Before we dive into the nitty-gritty of drawing mountains, let’s talk about why this skill is worth learning. Mountains are more than just geographical features—they’re powerful symbols of strength, resilience, and beauty. By learning how to draw them, you’re connecting with something bigger than yourself. Plus, it’s just plain cool!
Here’s a quick rundown of the benefits:
- Boosts creativity and imagination.
- Improves hand-eye coordination.
- Enhances focus and patience.
- Builds confidence in your artistic abilities.
And hey, who wouldn’t want to impress their friends with a beautifully drawn mountain? Trust me, it’s a conversation starter!
Basic Materials You’ll Need
Now that you’re pumped to learn how to draw an easy mountain, let’s talk about what you’ll need. Don’t worry; you don’t have to break the bank for fancy supplies. Here’s a simple list:
- Pencil (HB or 2B works great)
- Eraser (a kneaded eraser is ideal but any eraser will do)
- Sketchbook or plain paper
- Optional: Colored pencils, markers, or watercolors for adding details
Pro tip: Start with a light hand when sketching. This way, you can easily erase mistakes without damaging your paper.
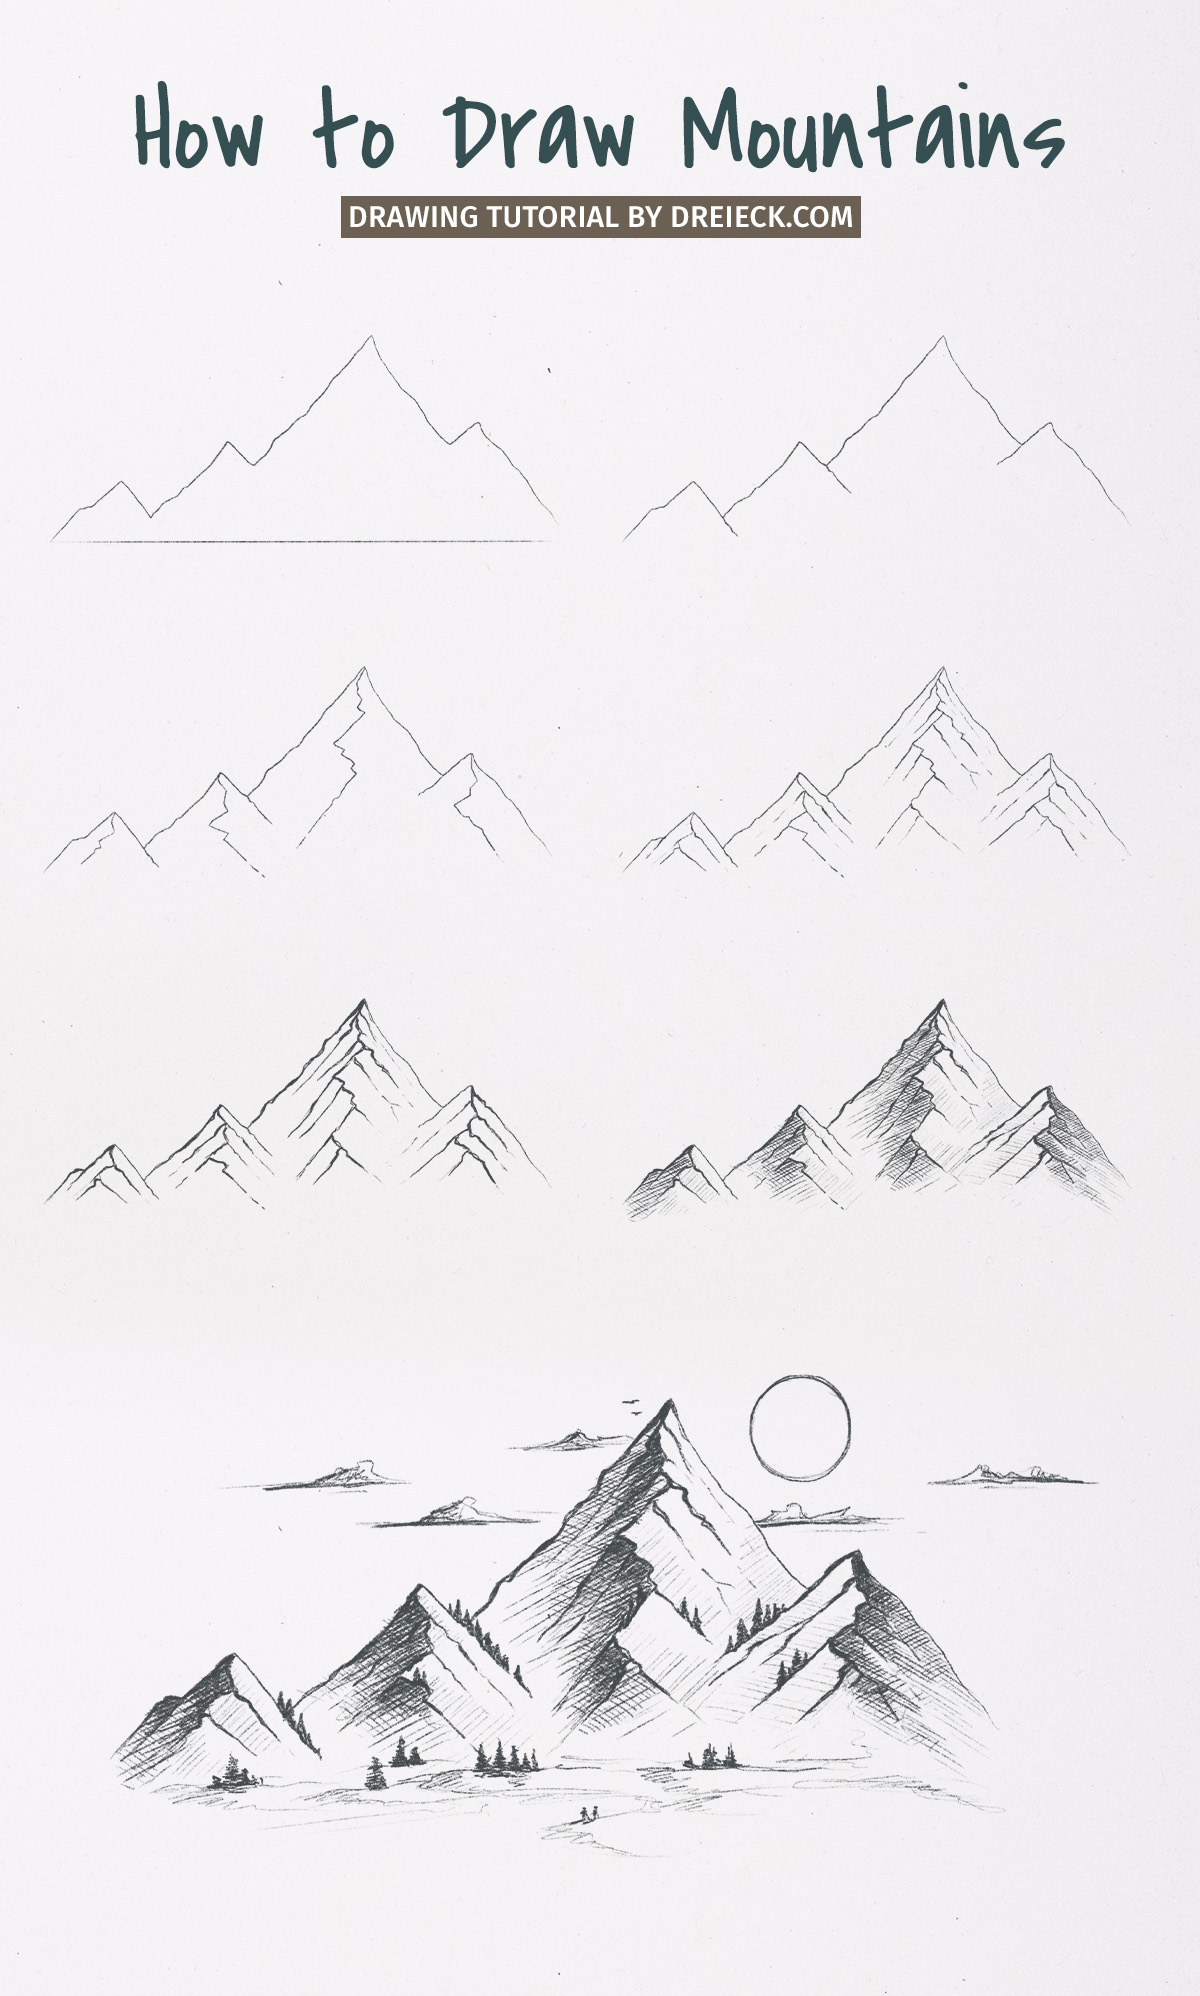
Step 1: Sketch the Horizon Line
Every great mountain starts with a solid foundation, and that foundation is the horizon line. This line represents where the sky meets the earth and serves as your guide for placing the mountain.
Read also:Taylor Tomlinson Hereafter The Life Career And Legacy Of A Standup Sensation
Here’s how to do it:
- Take your pencil and lightly draw a straight line across your paper. It doesn’t have to be perfect—just something to anchor your drawing.
- Decide where you want your mountain to sit in relation to the horizon. Do you want it towering above the line or peeking out from below? The choice is yours!
Remember, the horizon line doesn’t have to be flat. If you’re feeling adventurous, try adding some curves to give your drawing a more dynamic feel.
Step 2: Outline the Mountain Shape
Now comes the fun part—creating the actual mountain shape. For an easy mountain, think simple and triangular. You don’t need to aim for perfection here; nature isn’t perfect, and neither should your drawing be.
Follow these steps:
- From a point on the horizon line, draw a diagonal line upward to form one side of the mountain.
- At the peak, draw another diagonal line back down to the horizon line, completing the triangle.
- Feel free to tweak the angles to make your mountain look more natural. Maybe one side is steeper than the other, or the peak is slightly off-center.
Don’t overthink it. Just let your hand flow and enjoy the process.
Tips for Making Your Mountain Look Realistic
While simplicity is key when learning how to draw an easy mountain, adding a few details can make your artwork pop. Here are some tips:
- Add small curves or jagged edges to the mountain’s outline to mimic the ruggedness of real mountains.
- Vary the thickness of your lines to create depth and dimension.
- Experiment with different shapes if you’re drawing multiple mountains. Not all mountains are perfectly triangular!
These little touches will take your drawing from basic to breathtaking in no time.
Step 3: Add Shadows and Highlights
Shading is what brings your mountain to life. Without it, your drawing might look flat and uninspired. But don’t worry—it’s easier than it sounds.
Here’s how to add shadows:
- Decide where your light source is coming from. Is the sun shining from the left, right, or above?
- Using a slightly darker pencil (like a 4B), gently shade the areas of the mountain that would be in shadow.
- Blend the shading with your finger or a blending tool to create a smooth transition.
And here’s how to add highlights:
- Leave certain areas of the mountain unshaded to represent where the sunlight hits directly.
- Use an eraser to lighten specific spots if needed.
Shading might take some practice, but once you get the hang of it, your drawings will look amazing.
Step 4: Enhance with Details
Now that you’ve got the basic shape and shading down, it’s time to add those finishing touches that make your mountain truly unique. Here are some ideas:
- Draw small trees or rocks at the base of the mountain to give it context.
- Add snowcaps to the peaks if you’re drawing a winter scene.
- Include clouds or birds in the sky for added interest.
Remember, details don’t have to be complicated. Even a few simple lines can make a big difference.
Common Mistakes to Avoid
Even the best artists make mistakes, but knowing what to watch out for can help you improve faster. Here are a few common pitfalls:
- Pressing too hard with your pencil, making it difficult to erase mistakes.
- Forgetting to consider the light source when shading.
- Overcomplicating the details and losing sight of the overall composition.
Stay mindful of these issues, and you’ll be well on your way to creating stunning mountain drawings.
Step 5: Experiment with Color
Once you’re comfortable with black-and-white drawings, why not try adding some color? Colors can completely transform your artwork and add a new level of vibrancy.
Here’s how to incorporate color:
- Choose a palette that matches the mood you want to convey. Blues and whites work well for snowy mountains, while greens and browns suit forested landscapes.
- Layer your colors gradually, starting with lighter shades and building up to darker ones.
- Don’t forget to blend! Smooth transitions between colors will make your drawing look polished.
Coloring might seem daunting at first, but with practice, you’ll discover how much fun it can be.
Advanced Techniques for Mastering Mountain Drawing
Once you’ve mastered the basics of how to draw an easy mountain, you might want to challenge yourself with more advanced techniques. Here are a few ideas:
- Try drawing mountains from different perspectives, such as close-up or far away.
- Experiment with different textures, like rocky surfaces or smooth snow.
- Practice creating layered landscapes with multiple mountains and foreground elements.
These techniques will push your skills to the next level and open up endless possibilities for your artwork.
Resources for Further Learning
If you’re hungry for more knowledge, there are plenty of resources available to help you improve your mountain-drawing skills. Check out these options:
- Online tutorials and YouTube videos from professional artists.
- Art books focused on landscape drawing and shading techniques.
- Local art classes or workshops where you can learn hands-on.
Never stop learning, and always keep practicing. That’s the key to becoming a great artist.
Conclusion: Your Journey Starts Here
Learning how to draw an easy mountain is just the beginning of your artistic journey. With the right mindset and tools, you can create stunning works of art that inspire and impress. Remember to keep practicing, stay curious, and most importantly, have fun!
So what are you waiting for? Grab your pencil and start drawing. And don’t forget to share your creations with the world. Who knows? You might just inspire someone else to pick up a pencil and join you on this incredible journey.
Call to Action: Leave a comment below with your favorite mountain-drawing tip or share a picture of your latest masterpiece. We’d love to see what you’ve created!
Table of Contents
Here’s a quick guide to all the sections in this article:
- Why Learn How to Draw an Easy Mountain?
- Basic Materials You’ll Need
- Step 1: Sketch the Horizon Line
- Step 2: Outline the Mountain Shape
- Tips for Making Your Mountain Look Realistic
- Step 3: Add Shadows and Highlights
- Step 4: Enhance with Details
- Common Mistakes to Avoid
- Step 5: Experiment with Color
- Advanced Techniques for Mastering Mountain Drawing
When Is National Nurses Day In El Salvador? Everything You Need To Know
Short Haircuts For Men 2024: The Ultimate Guide To Trendy And Stylish Looks
How To Take Off Magnet From Clothes: A Comprehensive Guide

How to Draw a Mountain StepbyStep Guide for Beginners Drawings
How to Draw a Mountain StepbyStep Guide for Beginners Drawings

How To Draw A Mountain Landscape Easy
